| Ram II OP | CPL Overby's Motorpool Kit #MP058 |
| Article by Stephen Brezinski; last updated 3 October 2015 | |
 |
|
| Modeling the Sherman Tank in 1/72nd Scale |
| Ram II OP | CPL Overby's Motorpool Kit #MP058 |
| Article by Stephen Brezinski; last updated 3 October 2015 | |
|
|
| This kit represents a
1/72-scale conversion to produce the command and
observation tank for self-propelled artillery units and
is based on the Canadian produced Ram tank. The Ram is
kind of an intermediary step between the American M3 Lee
Medium tank and the M4 Sherman tank. The Ram in US
designations was actually referred to as the M4A5 though
apparently the designation was never popular and did not
stick. The Ram II tank was up-gunned from the 2-Pounder
of the Ram I, to a 6-Pounder gun. The Ram II OP was a
late production Ram tank with the main gun removed and
replaced by a dummy gun barrel and additional radios. The Ram was used only by the Canadian Army during WW2 though I have read that many remaining in Europe in 1945 were transferred to the Danish Army. Motor Pool lists this conversion for 1/72 Dragon kit #7273 M4A1 Sherman Normandy model, though I believe that this conversion kit can be used with a variety of 1/72-scale Sherman kits from Dragon, Trumpeter, ESCI, Italeri and others. Pretty much all we need to complete the model is a set of six VVSS (Vertical Volute Spring Suspension) bogies, two appropriate sprocket wheels, two idler wheels, and two lengths of Sherman track from your stash of Sherman parts. My goal is to produce a collection of all the M3 and M4 tank variants and that definitely includes the Canadian Ram. The Kit Parts I counted 17 pale blue-gray, cast resin parts. Several of these parts do not appear to be used with this conversion kit though, so go to the spare parts bin. Detail looks well crafted and accurate. This conversion kit includes no crew figures, printed instruction sheet, decal markings, or etched metal parts.
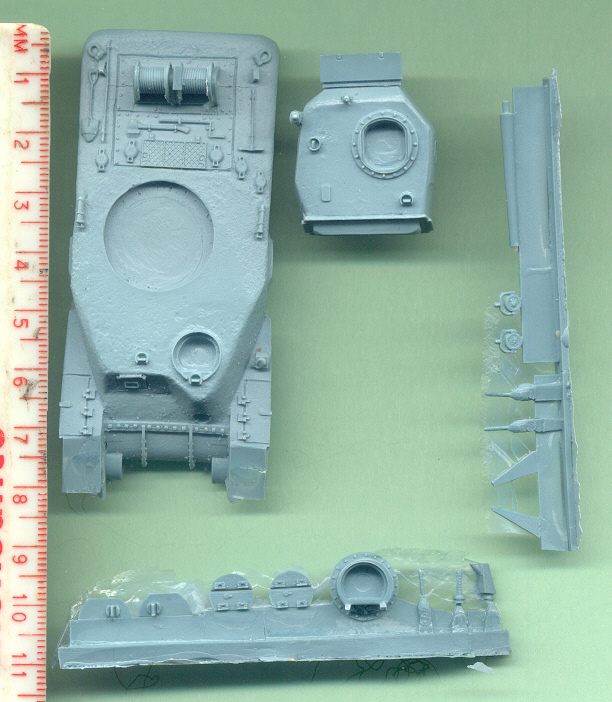
In this scan of the kit parts we see that none of the parts arrived broken or separated from their pore plugs. Starting with the hull at upper left we see the nice cast texture and the distinctive shape and features of the Ram II nose. By distinctive nose I mean the pointed area of the assistant driver with ball-mounted machine gun in the hull, and round roof hatch. A concern I can see here is that the hull appears to have a slight hourglass shape as viewed from above; more on this later. Earlier production Ram tanks had a machine gun turret on the bow similar to that on the US M3 Medium tank (see your references to see what I mean). Also at the nose we notice that the hull still sports the 3-piece final drive housing of the early Sherman and M3 Medium. Compared to my reference photos the driver's visor looks too small. Another change with the late Ram II was deletion of the side hull hatches and replacement by cast in appliqué armor plates visible here on Motor Pool's hull. Among interesting features are the small storage bins on the forward mudguards. The two spools of wire on the engine deck I believe are for communications wire. One of many differences from a cast M4A1 Sherman hull is that the fuel caps and turret ring on the Ram engine deck do not have any splash guards. On the two long pore plugs we have the crew hatches, headlights, machine guns and main gun barrel for the turret. The kit's main gun looks like the 75mm tapered barrel of the M4 Sherman and M3. Based on photos the gun barrel should be more like a straight tube, since on the Ram II OP it was a straight, un-tapered tube dummy gun. Some brass or aluminum tube should make an easy replacement if you want. The heptagon shaped turret is unique to the Ram tank, which is also cast with a convincing cast steel texture. handtools are cast onto the hull but look well done.
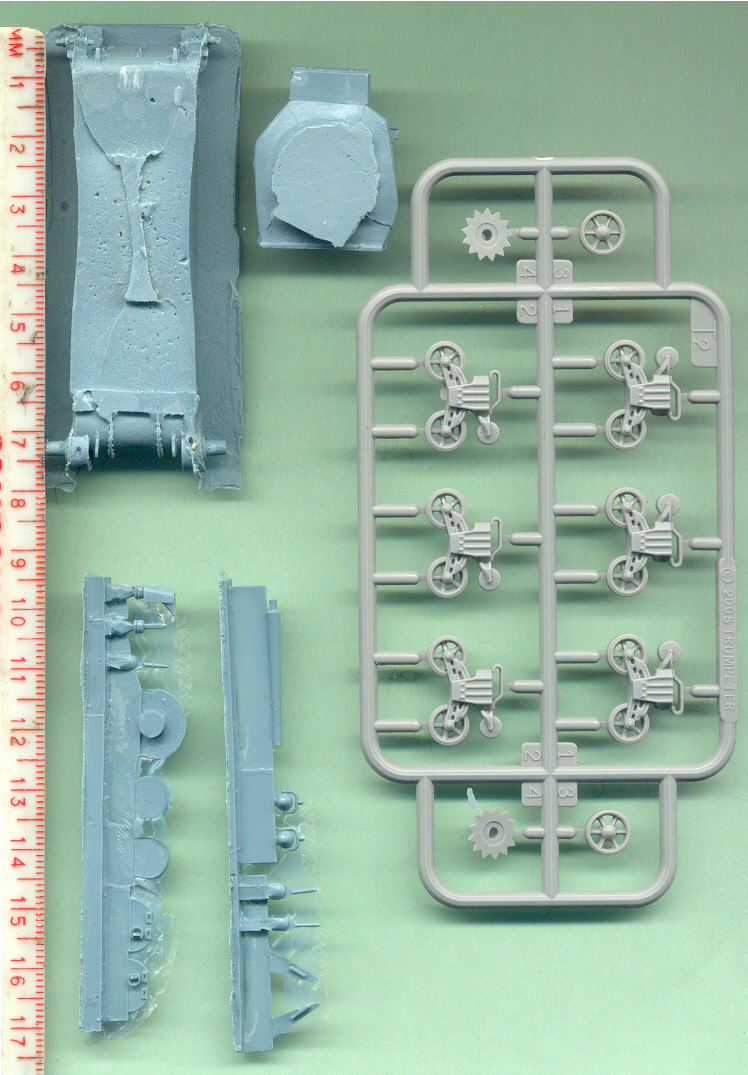
This scan shows the underside of the same parts as in the above scan. This view shows us that indeed the hull is miscast with a distinct hourglass shape of the hull bottom and the sponson. From experience this can happen when thick bodies of liquid resin cures, this may be why many resin kits have hollow hulls. Fixing this problem may be tough and require lots of filling and re-shaping. The lower hull sides where the suspension bogies attach may perhaps be fixed with a sheet of styrene card and some model putty. If we do not fix the warped lower hull the wheels and tracks will assemble askew. Another issue with my kit is the very front mudguards are too thin and have cracked; these will have to be either repaired with reinforcement or be rebuilt with plastic card. At right is a sprue of one-piece suspension bogies that are optional with Trumpeter Sherman kits that I will use with this model. Again, Motor Pool suggests a Dragon kit for this conversion but I believe that many 1/72-scale Sherman tracks, bogies and wheels from manufacturers other than Dragon would work. These roadwheels are the open five spoke type but I have also seen in six spoke stamped type roadwheels in WW2 period photos. Early Ram's had the early VVSS bogies with the return roller mounted directly over the suspension bracket like that on M3 Medium tanks, but the Ram II OP's seem to have had these heavy duty VVSS bogies like on Shermans. Track types I have seen on these Ram II vehicles are the all steel Canadian Dry Pin (CDP) tracks as seen on some late M4A1 Grizzly tanks, the WE210 rubber waffle pattern and the T54 steel chevron track types. Assembly Before the bogies and wheels could be attached the shrunken resin problem had to be fixed with multiple overlapping layers of sheet styrene and model putty to make the hull sides level: remove the hourglass shape seen in the photos above. This included the upper hull side, cast-in appliqué armor and the fender storage box. At the left we can see the thin, cracked fenders (mudguard).
The corrected upper hull areas will receive a coating of Mr. Surfacer 500 to try and match the nice cast texture of the resin model. The bogies and wheels are carefully glued on with help of reference photos and diagrams. The choice of wheels types is flexible, as the Ram II could be seen in historical photos with several different types.
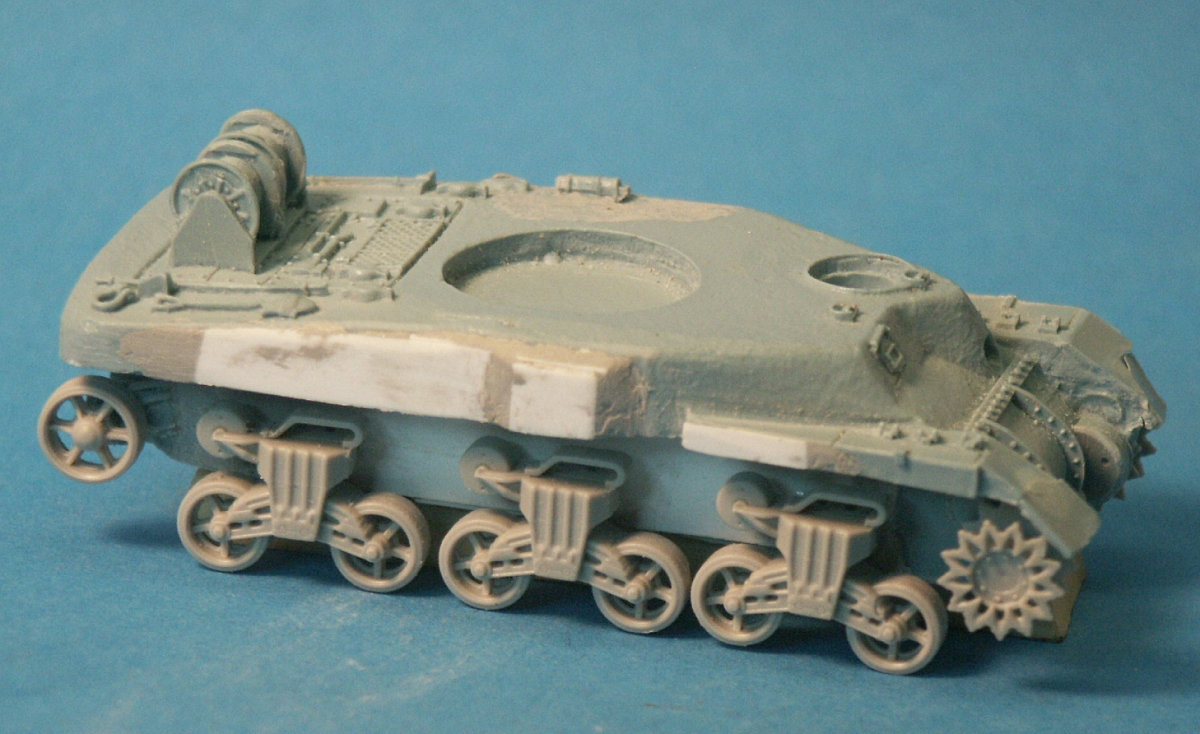
A view of the right side of the Ram II OP hull showing the repair of the misshapen hull. Here we also have a good view of the new hull front with replacement of the machine gun turret of the earlier Ram II and Ram I and replacement by a hull machine gun and round hatch. Among other differences from the M4A1 Sherman are no splash guard around the turret base, and no armored air intake cover on the forward engine deck, same as with the M3 Grant tank.
With the initial coat of olive drab some areas needing touch up and were given additional coats of Mr. Surfacer 500. The gun barrel has been replaced by a brass tube that better matches the dummy gun barrel of the Ram II OP. Some fine copper wire has been wrapped around the spools to simulate some communications wire.
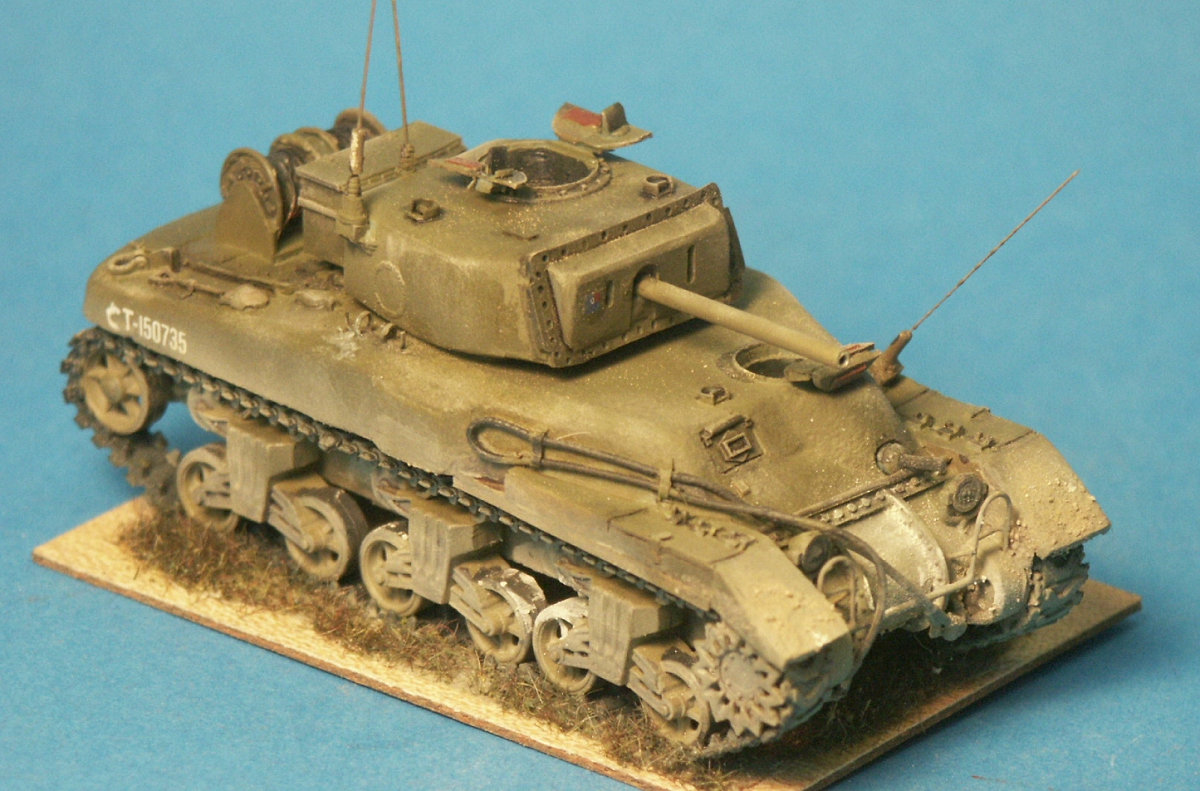
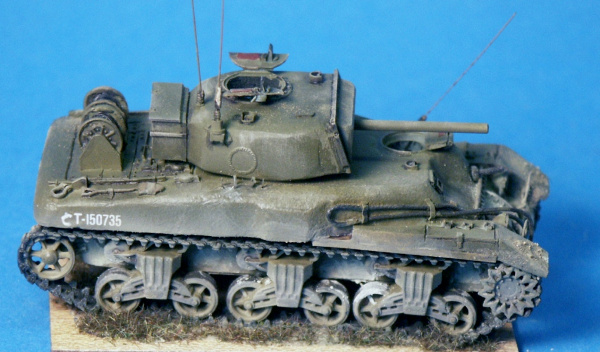
The completed model with some rudimentary markings for a Canadian command tank serving in NW Europe, 1944-1945. The repair work on the kit's hull sides does not look too bad. The tow cable on the vehicle's starboard side is patterned on several WW2 period photos. Motor Pool molds the fire extinguishers onto the hull on each side of the turret. Sometime during handling I broke one extinguisher off though. Rather than try and make a copy several bands were added in its place to represent and empty extinguisher bracket.
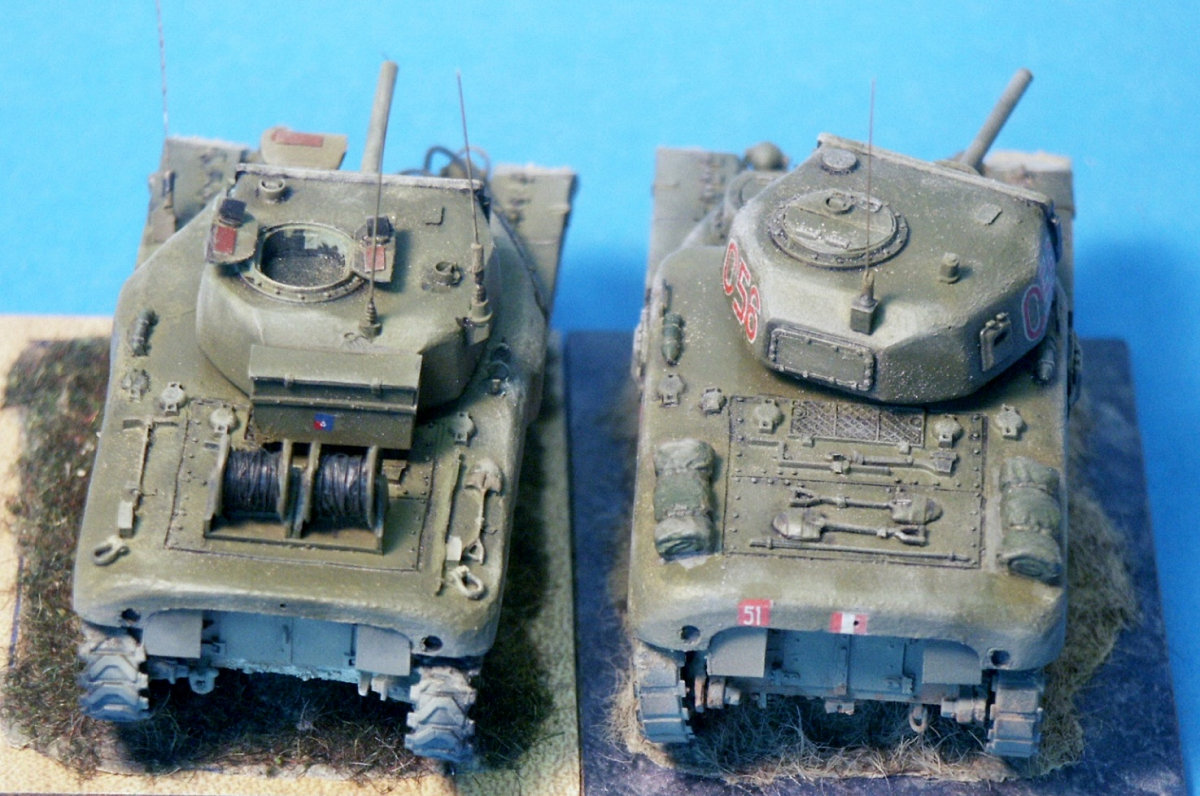
This rear view compares the Ram II OP at left with Overby's Motor Pools' Ram II kit at left. The Ram II OP is a newer Motor Pools release based on A Dragon M4 kit suspension (though I used the Trumpeter M4 suspension), while Overby's Ram II at right is based on the Hasegawa M3 Grant kit suspension. For a contest quality model I would not recommend either the Trumpeter or the Hasegawa suspension for the Ram II OP kit, but would use the Dragon, Mirage or Heller VVSS bogies and track. Yes, I know the right Ram II has crooked tracks, my fault. Note the two enlarged holes drilled in the rear plate representing the tail lights, and the small hole drilled in the center which I believe is for the engine starter crank. Conclusions The kit accuracy and molding quality is done well but does have some problems, mostly with the distorted hull shape and bad mudguards; but with work an experienced modeler can fix these issues, or a wargamer may ignore them (not to belittle a wargamer's assembly skills or standards). I have half a dozen Motor Pool kits that have no significant problems so these hull problems I think are an unfortunate fluke. This kit was purchased by the reviewer so I am only beholden to my spouse for letting me buy another model. References RAM AND SEXTON, AFV Profile 13, by Chris Ellis and Peter Chamberlain, Profile Publications Ltd. An old publication and may be unavailable. Camouflage & Markings of Canadian Armored Vehicles in World War Two, Part 1, by Steve Guthrie and Barry Beldam, Armor Color Gallery #4 http://www.ramtank.ca/ A nice website devoted to the Ram tank http://www.tanks-encyclopedia.com/ww2/canada/Ram_Cruiser_Tank.php |
| Modeling the Sherman Tank in 1/72nd Scale |