| M4A4 (Sherman V) Tank | ARMO/UM Kit #72093/#385 |
| Article by Stephen Brezinski; last updated 8 July 2015 | |
  |
|
| Modeling the Sherman Tank in 1/72nd Scale |
| M4A4 (Sherman V) Tank | ARMO/UM Kit #72093/#385 |
| Article by Stephen Brezinski; last updated 8 July 2015 | |
|
|
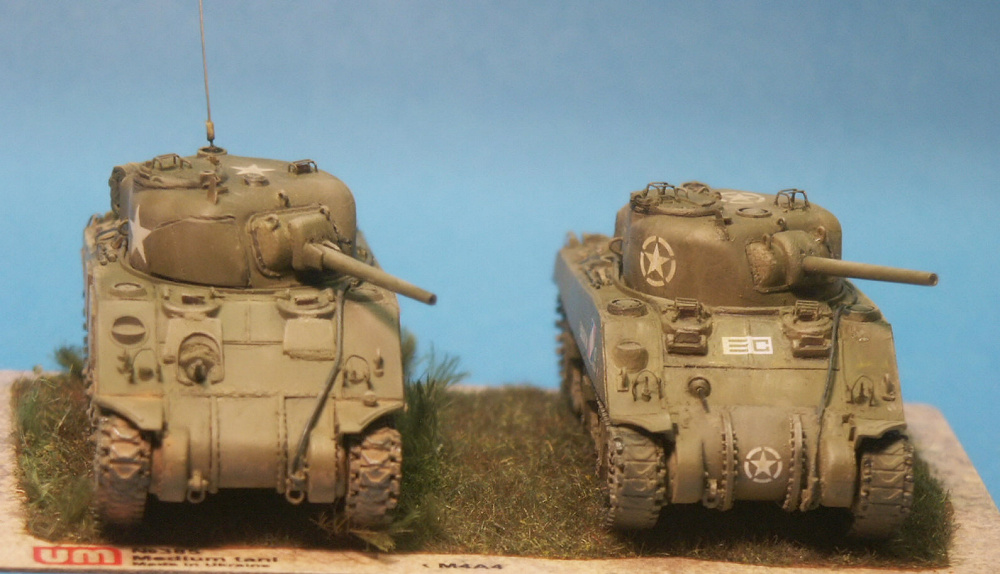
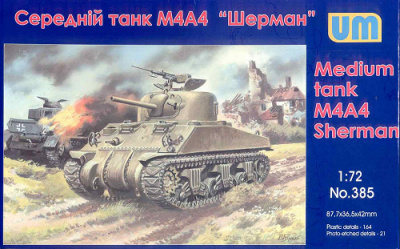
| Introduction These 1/72 scale model kits represents an American made “multi-bank” gasoline engine powered version of the M4 Medium tank of World War 2 armed with the medium velocity M3 75-mm gun: an M4A4(75). The term “multi-bank” refers to a bank of five Chrysler gasoline engines arranged in a star-pattern. About 8000 of this M4A4 tank version was produced from July 1942 to November 1943, not a long time period considering other M4 versions, and served till the war’s end and afterwards with the British, French, Polish and Chinese Nationalist forces. Because of the unusual engine configuration this Sherman is about 14 cm (6 inches) longer than other Sherman variants that were produced. The M4A4 was only produced by Chrysler Corporation and only had the three-piece bolted differential housing (the nose) and 57-degree angled glacis. They were also commonly converted to Sherman Firefly tanks (the Sherman Vc, armed with a British 17-Pounder gun). This construction review will compare and contrast 1/72-scale M4A4 Sherman tank kits from Uni Models Company (UM) and from ARMO. For an in-box review of the ARMO model please go to: http://www.onthewaymodels.com/reviews/ARMO/Armo72093.htm. The goals of my construction article is to see how each kit assembles and what small upgrades can be done to make them a more accurate, better model; considering time and the materials to work with I am not seeking to create an award winner. If I make a mistake I will point it out. UM’s box art for kit 385 gives us a good view of an early M4A4 with the 3-piece bolted nose, direct-vision (DV) viewports on the driver’s and co-driver’s hoods, and initial M34 rotor shield (gun mantlet). (The “hoods” are the protrusions on the 57-degree angled glacis in front of the driver’s and co-driver’s hatches; later hoods were cast with an additional periscope.) From the front this tank looks like an initial production M4, M4A2, or M4A3 Sherman which were also of welded hull construction. As the M4A4 was about 14-cm longer than the other welded M4 hulls the spacing between the bogies and roadwheels should be greater on the M4A4; I do not believe that the artist captured this extra length well in UM’s box art. IN ARMO’s M4A4 kit box art we can see a greater spacing between the roadwheels compared to the M4 and M4A1. As mentioned in my in-box review, the model in this box actually has the DV hoods meaning that ARMO put the wrong model photo on their box. This could be a big deal if you are intent on building a particular M4A4 at a particular time and place. For modelers new to the Sherman tank, compare this M4A4 with cast hoods to the UM box art above with DV (direct vision) hoods. Notice the greater distance between the VVSS bogies here than on the UM M4A4 in the above box art. This ARMO kit has more correct spacing of the two box depictions (No fear, UM gets it correct in the actual model). Construction
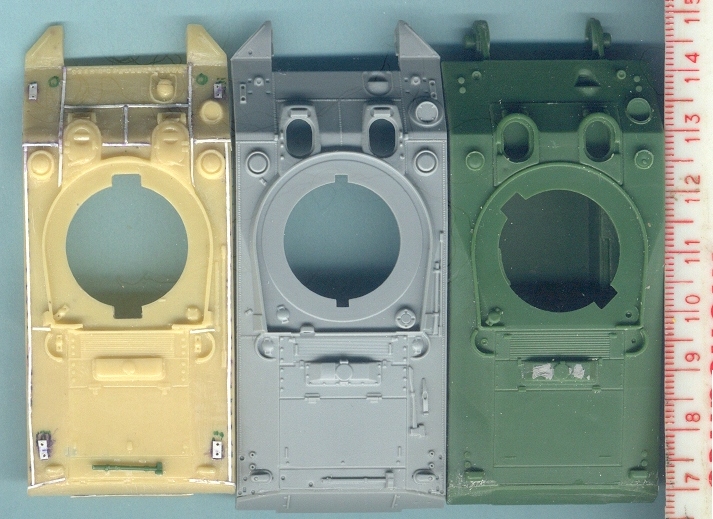
Here is a side-by-side photo of the ARMO (far left), the Dragon (center) and the UM M4A4 upper hulls for comparison. Starting at the left, the ARMO all resin hull is noticeably shorter than the Dragon and UM hulls. To represent the weld seams, thin strips of styrene plastic sheet has been glued down to the hulls. American made tanks were cleanly finished so the real weld beads would not really be this prominent. Rectangular pads have been added under the four hull lifting rings as was present on early M4A4 hulls. Examining the glacis plate you’ll notice that the glacis is made of six individual armor plates, not including the DV hoods. Drawbacks to the ARMO hull include: both the fuel caps, grouser covers and rear right mushroom-vent are way too small just like on the ESCI M4A1 kit hull, the hull is too short, details are a little soft. Also, some of the resin surface is a little irregular and sagging like on the turret roof, the hull sides and on the glacis. Though not technically being reviewed here, I added the Dragon hull to show the closest thing to being a perfect 1/72-scale M4A4 hull. Detail is sharp and accurate, and scale is correct. For example, this is the only M4A4 here that includes the exterior fire extinguisher handle in the rear turret splashguard. I think the weld beads are superbly done. The dark green UM M4A4 hull at far right is about accurate in dimension and details, better than the ARMO hull. With the UM Shermans being modular kits (including parts for other Sherman variants) we have choice of either the DV driver’s hoods as shown here or the cast hoods with periscopes. Faults with the hull appear to be too-small vent domes on either side of the driver’s hatches, a missing rear turret splashguard, and several shallow sinkholes. On the hull I see no weld beads connecting the armor plates.
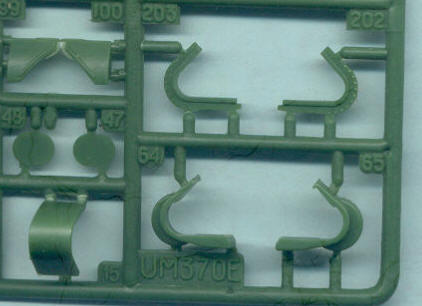
Here on UM’s sprue–E are the five parts that make up the 3-piece bolted differential housing (a.k.a. final drive assembly)that make up the nose of the tank: parts15E, 64E, 65E, 202E and 203E. Where ARMO casts their 3-piece differential cover as one resin part, and DML casts theirs as three parts, UM does theirs in five parts. UM’s method is not necessarily bad and the parts look fine on the sprue, however when I went to assemble them I ran into a problem. During assembly I found a serious problem in putting this differential cover all together.
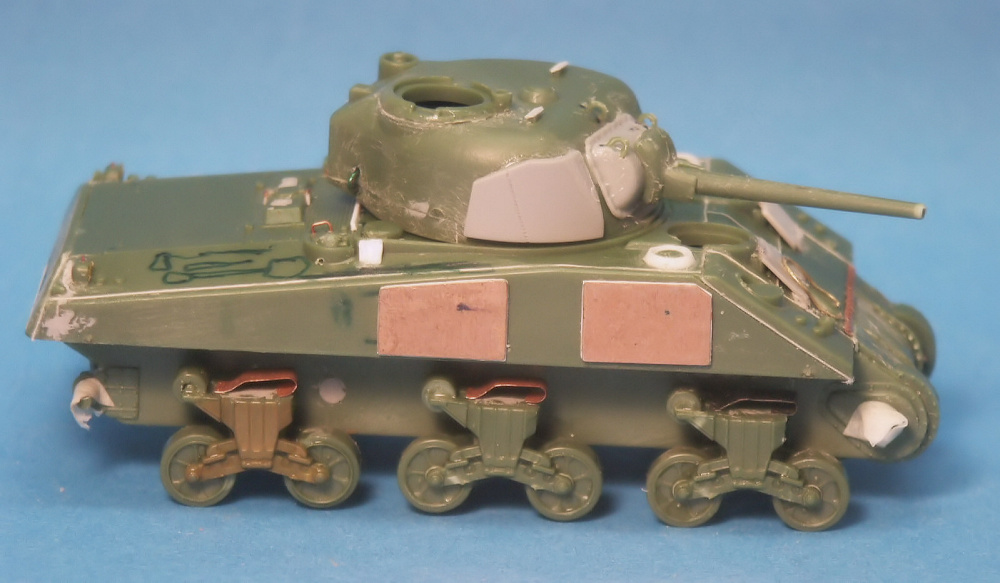
The UM hull in this photo is partially assembled. There are two issues to cover for this photo: the added detail, and the problems with assembling the 3-piece differential housing. When trying to assemble the 5-part final drive assembly parts I found that the assembly was just too wide when the parts were assembled side by side, but too thick to mate together. Part 15E fits okay onto parts 202E and 203E. It looked like the flanges on the side of parts 202E and 20E3 should nest into parts 64E and 65E, however the plastic on parts 64E and 65E was just too thick for 202E and 203E to mate with. To make them all fit together the outer sides of parts 202E and 203E was significantly trimmed off with a sharp blade and files. Unfortunately in doing this some of the boltheads were damaged. I see no good reason that UM could not have used the same molding technique that Heller and DML uses with their M4A4 Sherman and that ESCI also used with their old M12 GMC kit. Be aware that the differential cover parts 202E and 203E are mislabeled in the UM M4A4 kit assembly instructions as parts 104E and 105E. To simulate the weld beads on the UM hull, I cut shallow grooves on the hull sides, glacis, and deck. The grooves where then filled with fine thread and glued in with cyanoacrylate (super) glue. It looks to me to be a little exaggerated, too prominent here, but we’ll see after painting if this technique works. The vent domes on each side of the driver’s hatches have been made more accurate by adding a splashguard rim of beveled styrene tubing. These ventilation domes look much more accurate now but still not as well portrayed as DML’s.
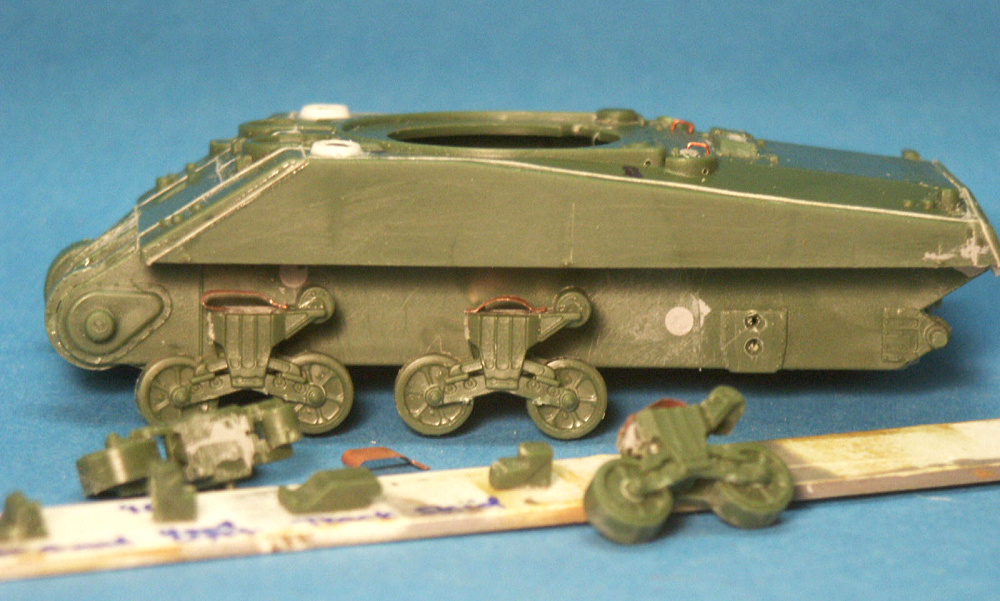
The ARMO VVSS bogies appear to be a copy of the ESCI kit bogies but in resin rather than styrene plastic. Appearing rather intimidating to clean up off the resin pour plugs I found removing the parts to be not too difficult with a new, sharp X Acto blade. The bogies share all the detail deficiencies that the old ESCI kit (now an Italeri kit). Like with the DML and UM bogie assemblies some model putty may be needed where the bogie parts join together. The roadwheels are the 6-spoke solid style. Several of the track skids on the bogies broke while removing the parts from the pour plugs. The skids would do well to be replaced by etched brass track skids available in several aftermarket etched brass frets for the M4. Again, the weld seams are simulated with then strips of styrene plastic. On the side are some marks where I contemplated adding some applique armor plates but decided not to.
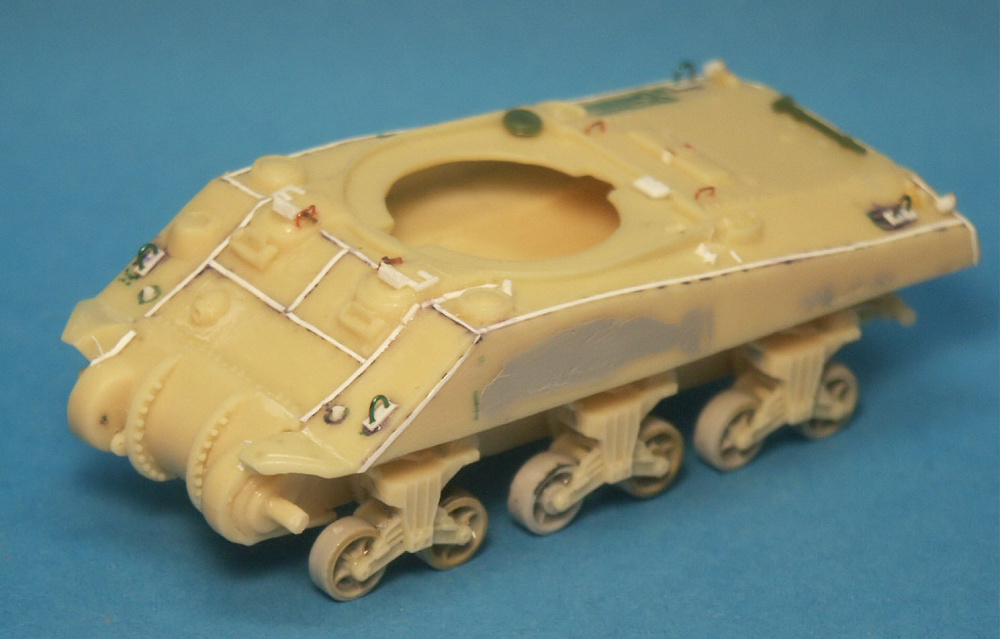
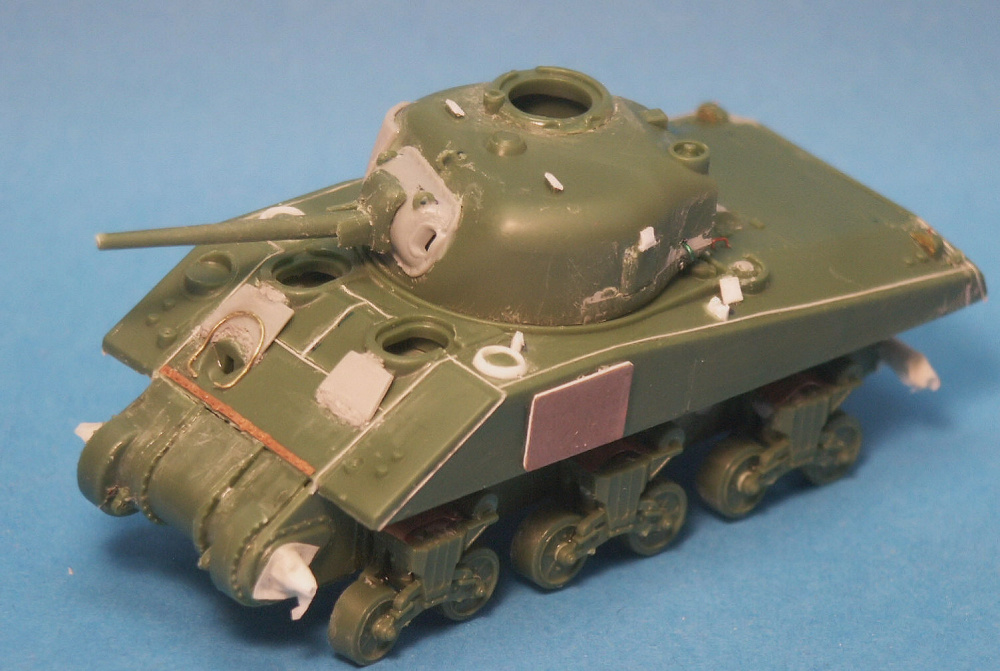
Looking at the UM glacis plate you may note that the glacis is irregular and has sunk in a little, like the hollow hull casting was removed from the mold before the resin fully cured. I have another ARMO Sherman kit that does not have this defect on the glacis so it is not common to all AMRO Shermans. The surface detail on the driver’s hatches is soft but not horrible. The 3-piece differential cover (final drive assembly) at left I think is done pretty well and was a lot easier to work with then UM’s housing. On the glacis and rear engine deck small pieces of styrene have been added to simulate lifting ring pads, matching those in my references. The low-bustle turret, at right in the photo, assembled fine. The pistol port is not as well detailed as on DML’s M4 kits. On the turret roof you can make out a circular patch of model putty which fills in a shallow dimple on the roof; again it appears that the turret part was removed from its mold before the resin fully hardened. An odd thing is that ARMO did not cast the machine gun mount on the commander's cupola.
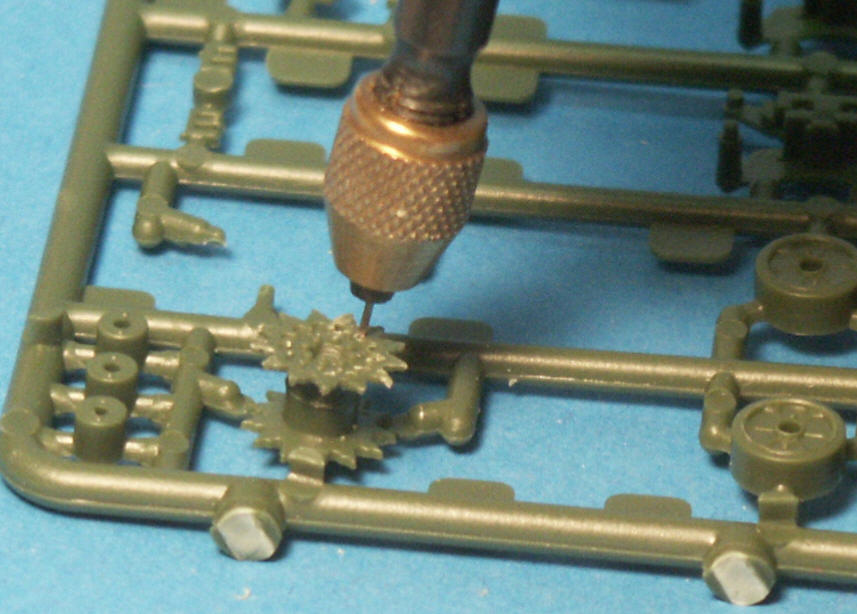
Getting back to the UM plastic kit and sprue-A. The fancy sprocket wheels (parts-1A), the type seen on the M3 Medium Grant tanks, had small holes between where the sprocket parts assembled together (please see the references) so a fine drill bit added these holes to add just a little bit more detail accuracy. At far right are several of the 6-spoke solid roadwheels (parts-5A), which by the way, are hollow on the reverse side. At far left on the sprue are three return rollers (parts-6A); UM offers the only Shermans I know with separate return rollers for their VVSS bogies.
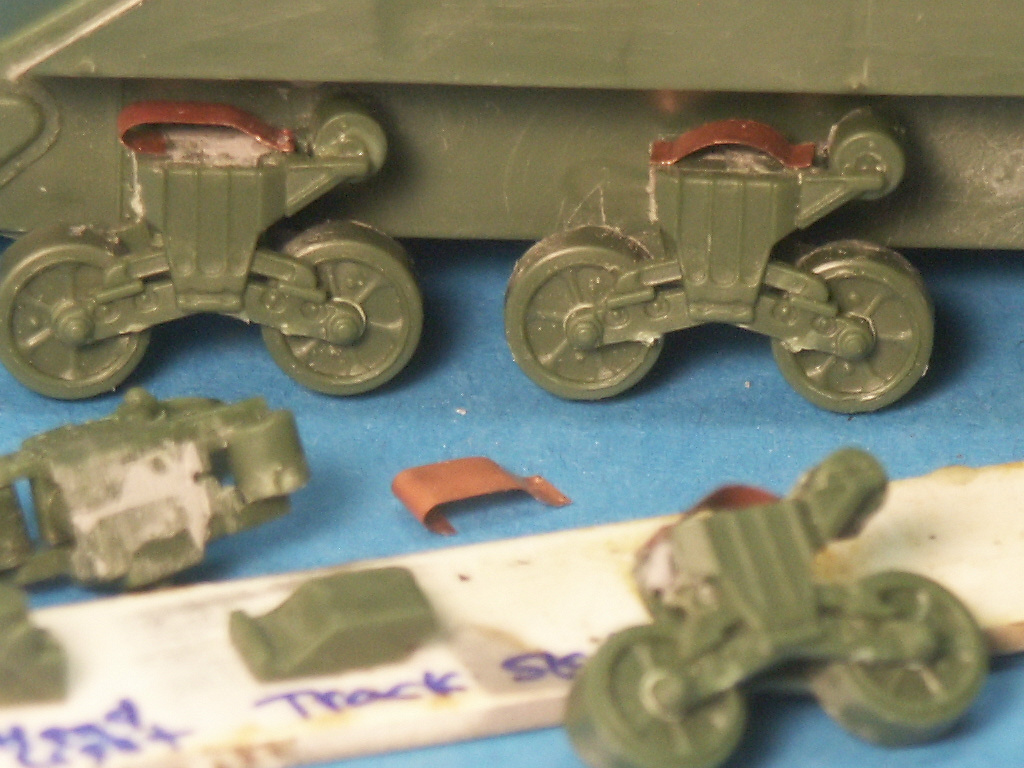
Here is a close-up of the UM bogies partially and fully assembled. In the foreground are the templates that UM gives us in each M4 kit to aid in correctly forming their etched brass light brush guards and the brass track skids. The templates are glued down to a strip of thick styrene to make them easier to use. These forms are helpful with etched parts from other Sherman brass frets as well. At right are several bogies with the early symmetrical track support skid to add a little variety to the model (though with the track on, these support skids will be barely visible). Having separate etched brass track skids gives us the flexibility to more easily make this variation. The left skids is the later and more common track support skid.
The UM lower hull had ejector pin marks that will be visible after assembly if you do not fill them in and sand them smooth.
At this point on the ARMO hull, details like the lifting rings, hatch detailing, raised periscopes, extinguisher handle fixture, and engine deck lift handles are added. Many small details such as periscope guards are left off till the tracks are added since I tend to break off small parts during handling. On the hull side is model putty to fill in more dimples in the resin. Looking closely you may notice that the ARMO solid 6-sopke roadwheels have been replaced by open 5-spoke roadwheels which are extras from a Trumpeter M4 model kit. With mixing the different ARMO and the Trumpeter roadwheels I wished to imply an M4A4 that had been upgraded.
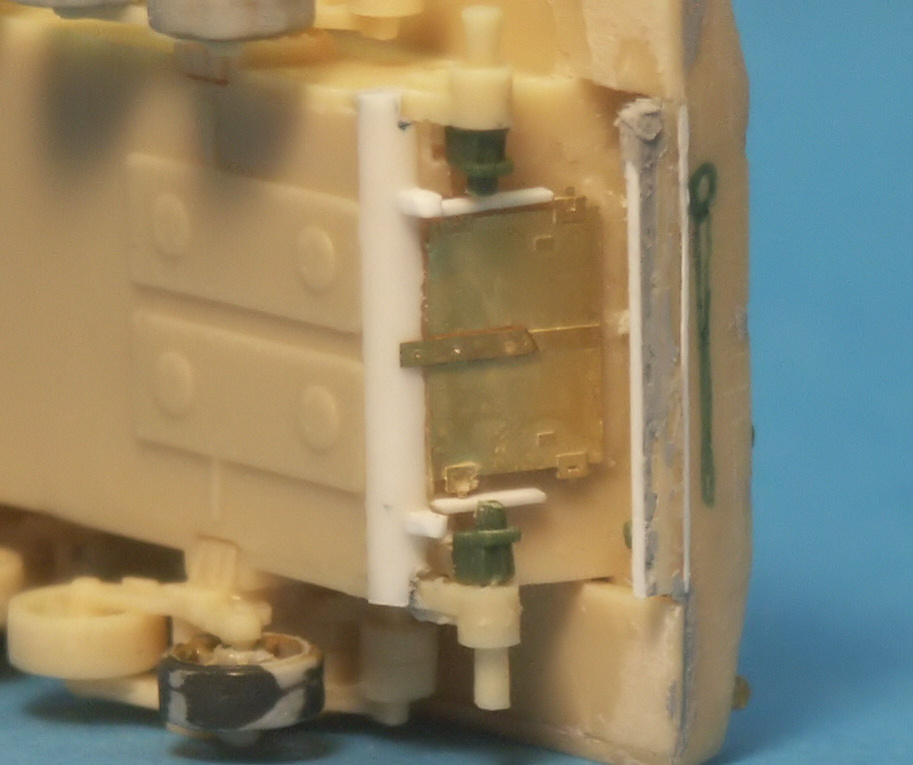
The ARMO lower hull and rear are weak in detail, especially compared to the DML and the UM M4A4 kits. Using my references etched brass parts, extra parts from a UM kit, and scratchbuilt parts have been used to dress up the area. The lower transition strip between the rear engine plate and the floor in all my M4A4 references have this as a rounded part rather than a narrow flat plate so a white styrene tube was cut and sanded down till it fit. The upper rear plate of the ARMO M4A4 kit did not appear to hang down low enough so a thick styrene strip was glued on so it looked more accurate. On initial M4A4 rear armor plates the plate was made of two parts welded together so a weld bead was simulated.
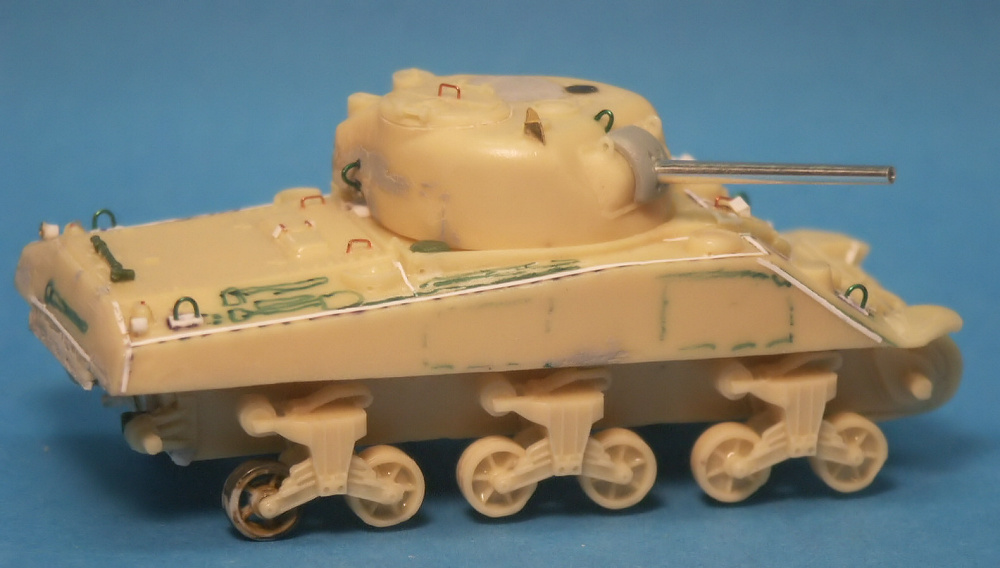
The ARMO M4A4 with some of the small details added and ready for the sprocket and idler wheels, tracks and then final details before painting. Taillights have been fabricated with styrene rod; up on the turret a spare DML gun mantlet (rotor shield) has been paired with ARMO’s turned aluminum gun barrel. Using reference plans the locations for the handtools have been drawn onto the hull with green marker pen.
The UM M4A4 has had the kit’s etched brass side applique plates added after the brass plates where made thicker with some thin styrene sheet. The turret’s appliqué plate was taken from a DML Sherman kit since I thought the brass part from UM could not be easily bent to the contours of the turret.
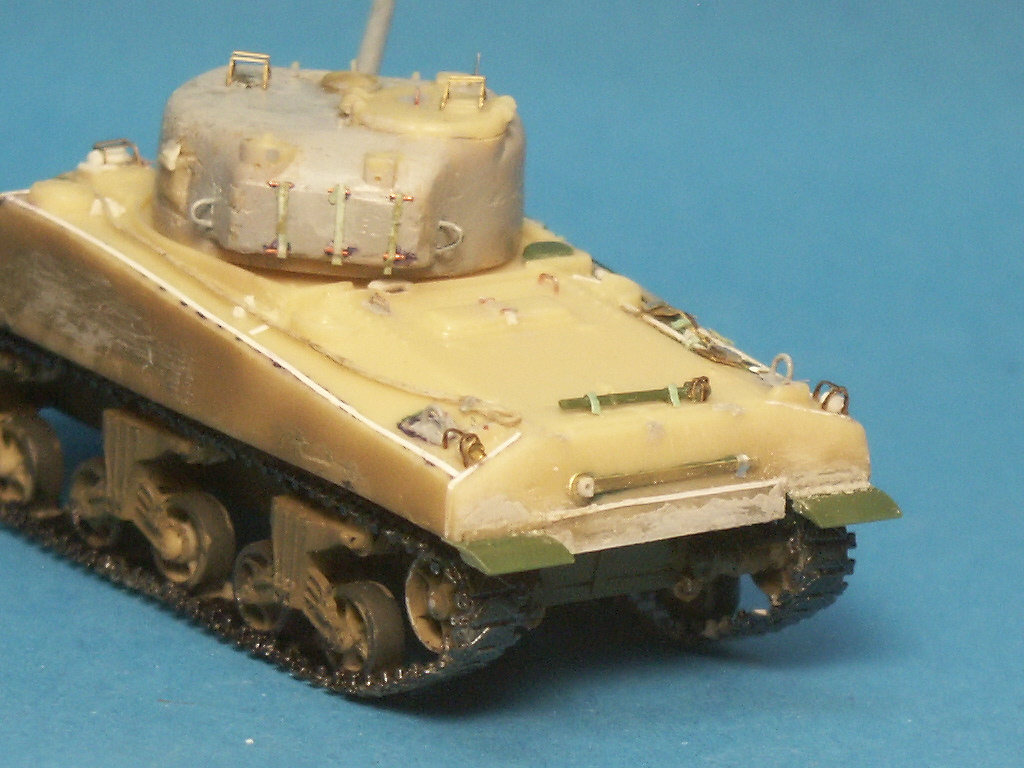
Spare applique plates from a DML Sherman kit have added and a weld attaching the plates to the glacis is fabricated with gray model putty. The UM kit gun M34 mount (part-61B) has been replaced with a much better spare part from a DML Sherman kit. The UM kit's bow machine gun cover bracket has been replaced by one made from brass wire as the etched brass part-F81 included in the UM kit is flat; notice how this inverted U-shaped weather cover bracket runs up over the appliqué armor plate. On the left side of the hull roof small brackets have been added to hold down the tow cable.
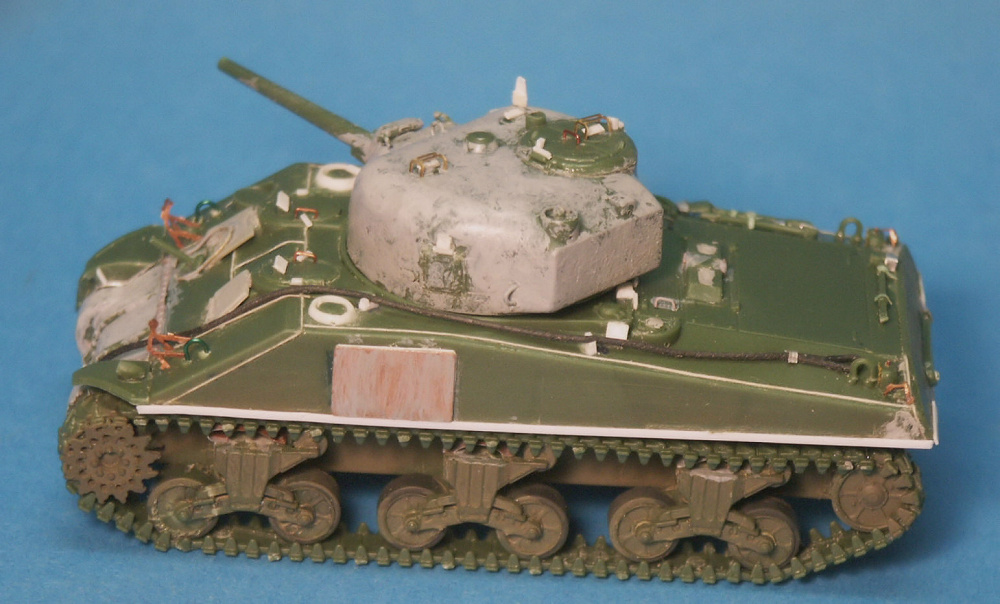
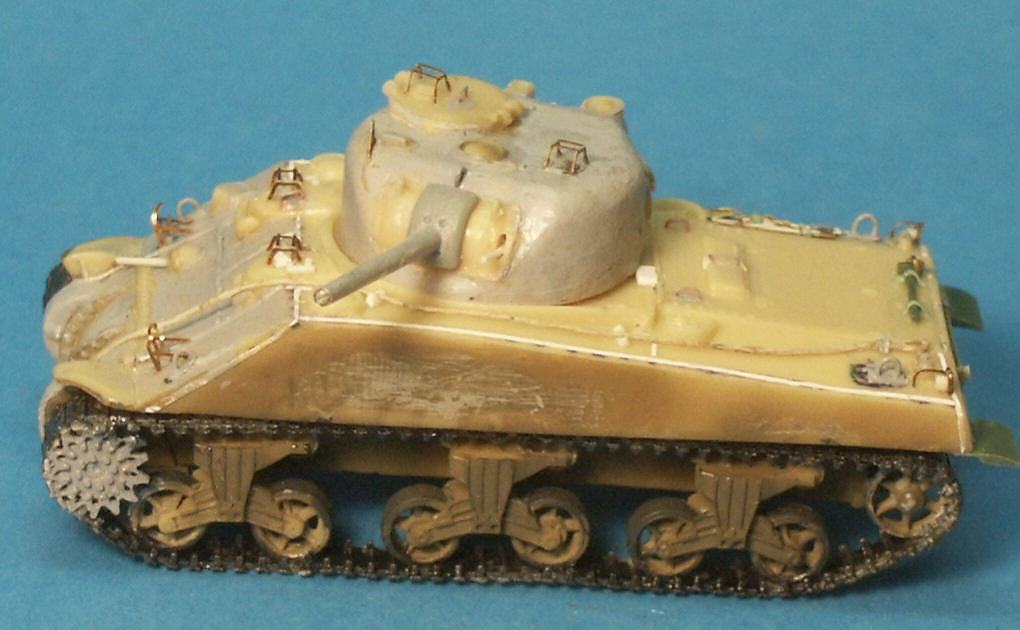
The UM individual link and length tracks fit well. They are not the finest M4 Sherman track links available, such as compared to the detail of DML’s Sherman track. What could be done better for example are end connectors that are long enough to look like duckbill extenders. With the track mounted many other details have been added such as the etched brass light guards, a spare tow cable from a Mirage M3 Lee kit, details on the hatches, and strips along the edge of the sponson for mounting sand shields (skirts). The turret has been given a coat of Mr. Surfacer 1000 to act as a primer and give a little cast-metal surface texture. The lower hull and suspension parts were given a coat of olive drab prior to mounting the tracks. Remember, the roadwheels had solid rubber tires so should be dark gray, the idler wheel at the rear was all metal so should have a metallic steel color on the running surface.
The headlights were left off both the UM and the ARMO models, as was often done by the tankers in combat.
From this view we you may see the extra long track link end connectors. This UM Sherman does not come with a rear bullet splashguard, the armored strip on the engine deck immediately behind the turret. A splashguard was scratchbuilt with a strip of thick styrene. The handtools were given hold-down straps made from tape, and brackets made from light sheet aluminum.
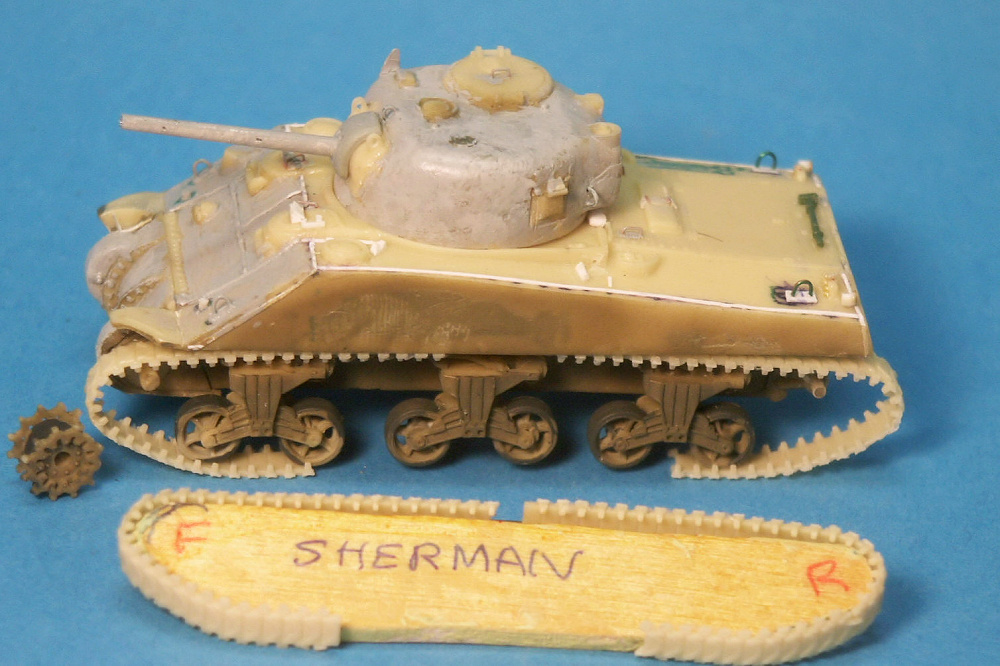
Going back to the ARMO M4A4 kit, and the all resin track supplied with the ARMO model kit. Working with all resin track I find a real chore. To bend the track around the sprocket and idler without breaking I use a wood form (see article at http://www.onthewaymodels.com/articles/SBrezinski_Tracks.htm). This form is for a generic M4, M4A1, M4A2, and M4A3 in 1/72-scale. The M4A4 has a longer hull and wheelbase than the other Shermans so we’ll have to adjust by adding a few more links. I recommend gluing the sprocket and idler wheels to the track before mounting them on the tank then adjust so the wheels are all in line and straight, and removing or adding track links as needed. I am glad I did this as I found that the ARMO track was too wide and the ARMO sprocket wheel teeth did not fit into the track’s end connectors! Oye!
To fix the sprocket fit problem with the track, I fortunately had a spare pair of Fancy sprocket wheels left over from an MR Models Sherman that fit and that look very good. (Please see the references for the official designations for the wheels and other parts.) The mounting axles had to be cut off the lower hull and holes drilled to fit the pin on the MR Models sprocket wheels. Here is a good view of the too-small track guide teeth. Guide teeth and end connectors broken during manufacture and assembly were replaced with pieces of styrene plastic. With the track mounted, the small brass detail parts included with the ARMO kit can be added. The roadwheels here are the early 5-spoke open style, and the idler wheel is the 6-spoke open style, both used on the M3 Grant and the early M4 Sherman tanks. These wheels are extras from a Trumpeter Sherman kit. Painting
Ready for painting we can see all the separate etched brass tools added, the taillight guards, the gear lashing points on the turret bustle and some tie-down straps simulated with tape. At the bottom of rear engine plate we may make out the weld bead simulated, and below that an added strip of styrene to make the plate hang down lower. A tow cable is made with tea-bag string coated in white glue.
I apologize now about the periscope guards, rather than toeing out like a tripod, the legs should bend inward. When I remembered this, the glue had dried and I feared breaking the fine brass parts if I tried to cut them off. No offense meant, but the model is not worth using a new, additional expensive brass fret.
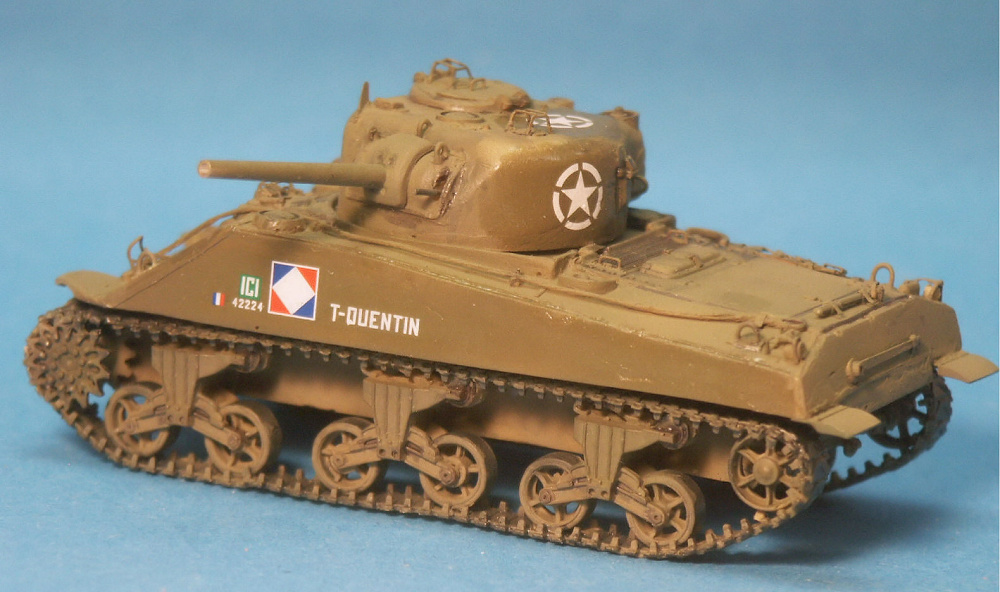
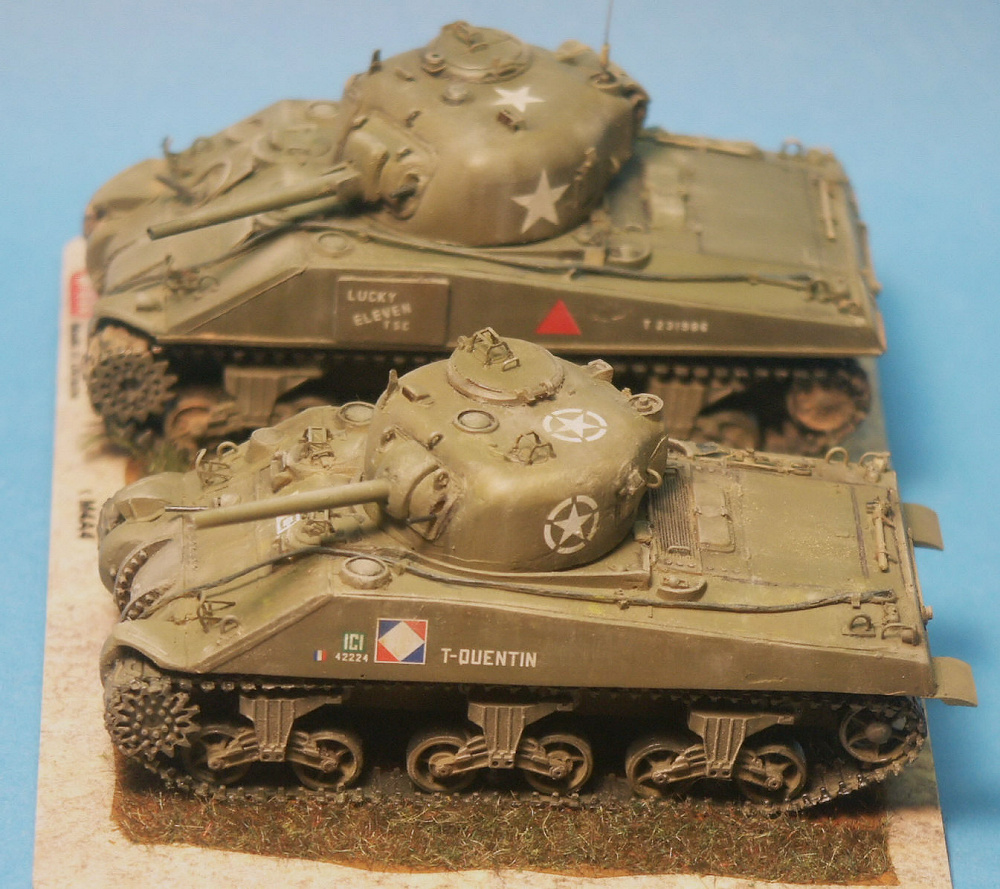
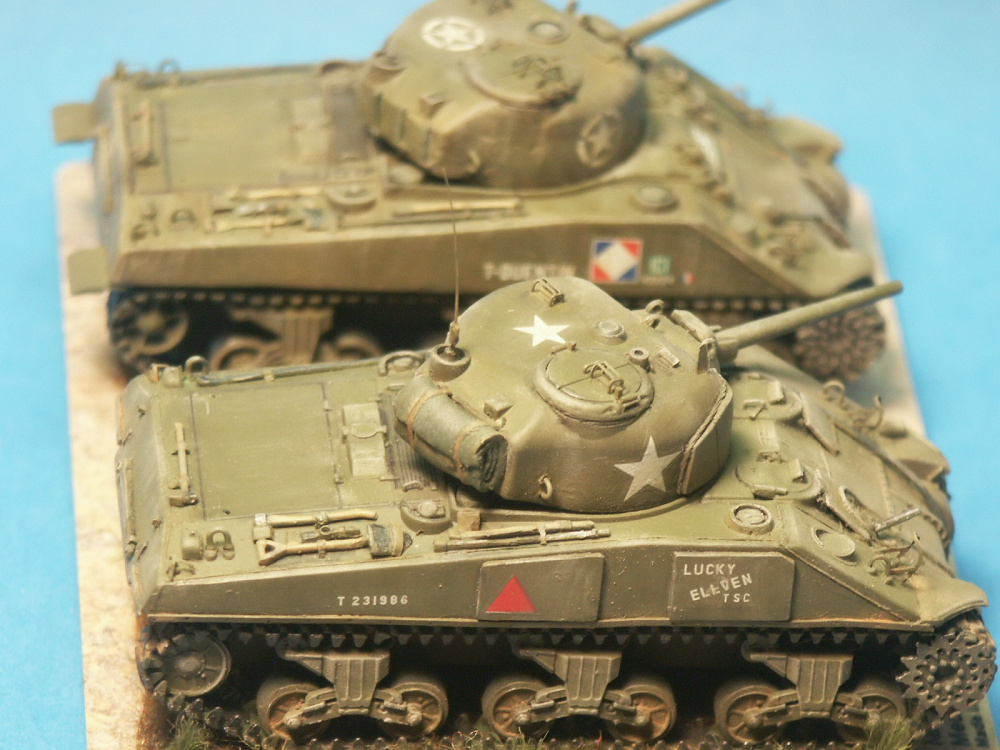
The UM model kit above, and the ARMO model below, now have a final coat of olive drab acrylic paint and clear gloss acrylic in areas where the decals belong. The UM decals were a little stiff when applied but posed no problem and went on well with decal setting solution and decal solvent. Notice in the above photo that the LUCKY ELEVEN markings have a miss-print in an E and the V of the word ELEVEN. I have not been able to find a historical photo of this particular tank so will have to trust UM that the markings are accurate. The markings are for a Sherman of the 1st Provisional Tank Group serving in Burma. I have read several times that the M4A4 was not used in combat by United States Forces during WW2, however this is an exception with this unit. The 1st Provisional Tank Group was composed of the US Army 527th Ordnance Company and six provisional tank battalions of the Nationalist Chinese Army prior to the Chinese taking over full responsibility of the Shermans. The M4A4 Sherman V’s were borrowed from the British and have some features of British modified Shermans, such as the T- serial number and red triangle. The ARMO model kit below comes with no markings and I was stumped as to some interesting markings for this very early production M4A4 direct vision Sherman. Even though I have no reference that this particular French Army M4A4, T-QUENTIN, had these particular early features. I used these markings from a Dragon M4A4 kit because I wanted to have at least one French Sherman and one initial production M4A4 in my collection. The Dragon decals applied very well and were very clear when applied.
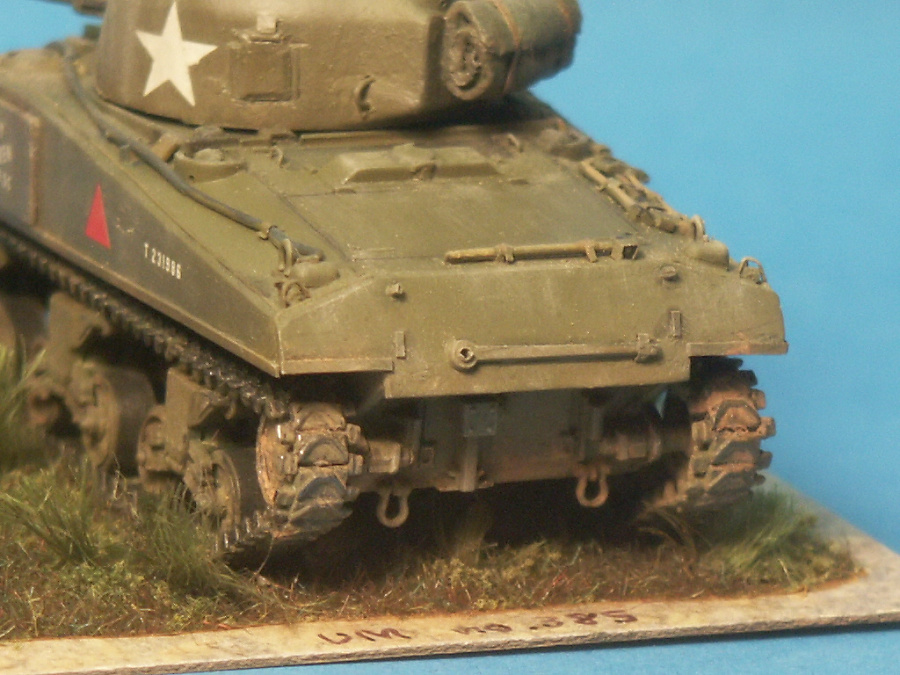
Mounted on a base side by side we can compare and contrast the models and the features of these direct vision Shermans. It is not a trick that the ARMO model at right appears lower than the UM model at left. The ARMO model measured 35–mm high where the UM is 37-mm high. The botched 3-part final drive assembly on the UM model is really evident here (at least to me) when compared to the better ARMO final drive (differential) assembly.
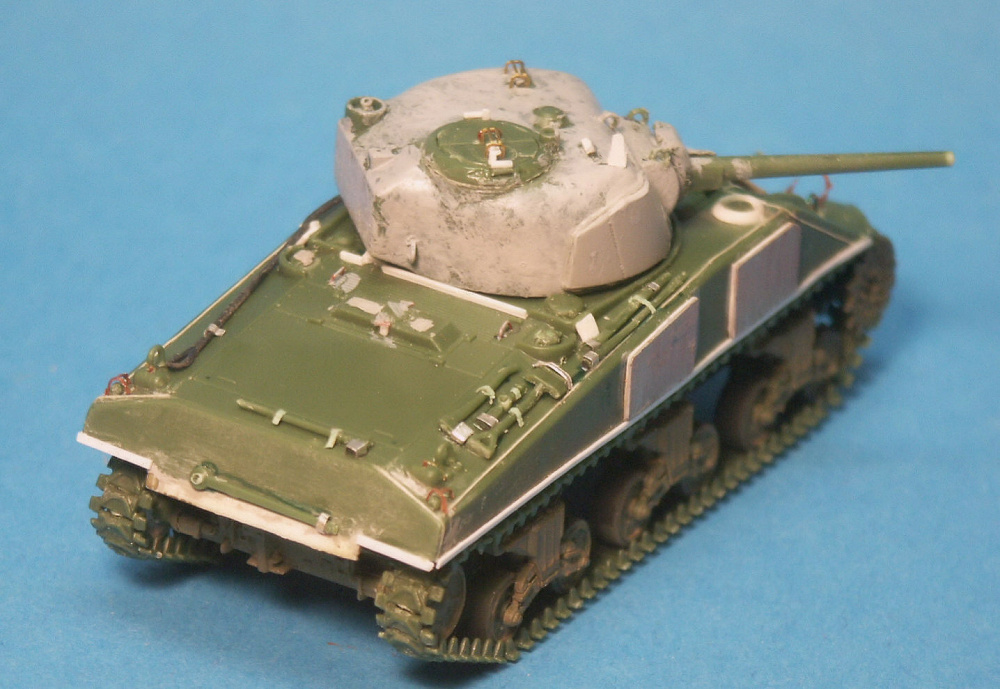
In this overhead photo we can examine the different ways that ARMO and UM depicted the features of their M4A4 Shermans: the ventilation domes, radiator bulge on the engine deck, pistol ports on the turrets, and antenna pots on the glacis plate. ARMO did not portray a machine gun mount on the cupola ring; in hindsight I feel I should have simulated the mg mount with a short piece of hollow plastic rod. Now that it is painted I notice some imperfections on the ARMO hull side that should have been filled with putty and sanded smooth. The UM model measured 87mm long while the ARMO model in the foreground is 85mm long. A full scale M4A4 tank is 605.8-mm from front track to end of the mudguard, which converts to 84mm long in 1/72 scale. To my surprise the ARMO model measures the closest to 1/72 scale in length. Both kits are about 36-mm wide which is spot on for 1/72 scale. The UM model stands 37mm tall and the ARMO model is 35mm tall. With a full scale M4A4 scaling down to 38mm high in 1/72, the UM M4A4 is the closest to correct height in 1/72.
In the section covering the M4A4 in the reference book Son of Sherman Vol. 1 it is mentioned that the M4A4s of the 1st Provisional Tank Group were borrowed from the British which I interpret to mean from British stock possibly modified for use by UK forces. On page 115 is a photo of the rear of one of these tanks and on the rear engine plate I noticed four protuberances that match the mounting brackets of a Sherman V Firefly storage box; very interesting. These brackets were simulated on this UM Sherman V.
Conclusions Both the UM and the ARMO M4A4 Sherman kits have their nice features and deficiencies. Both build into reasonable representations of an M4A4, Sherman V. The ARMO model offers a better differential housing, better etched-brass parts and a nice turned aluminum 75mm gun barrel. The UM M4A4 is for the most part easier to assemble and has better track, better upper hull, open driver’s hatches; but UM’s major deficiency is their 5-part differential assembly. ARMO’s greatest deficiencies are the imperfections and irregular surfaces of the resin casting, the inaccurate scale, the track not fitting the resin sprocket wheels, and inaccurate details carried over from the ESCI Sherman. Neither kit compares as well to the Dragon M4A4 model kits in 1/72 scale. ARMO’s major problem is being based on the old ESCI M4 kits, but at the time these ARMO Shermans were made the ESCI was the only VVSS Sherman we had in 1/72 and we were very thankful to have them. With the challenge of building a resin model and detail deficiencies of the ARMO M4A4 (based on the old ESCI Sherman model) and the plethora of new Sherman kits available the past few years, I wonder about the market for these resin kits in the future. I enjoyed building my ARMO and UM M4A4 kits, thinking of them as a challenge for my building and detailing skill. MR Models offers what appears to be a very nice resin and metal M4A4 kit. References Son of Sherman Volume 1, The Sherman Design and Development, by Pat Stansell, Published by Ampersand Group (2013). ISBN 978-0-9773781-1-1 Sherman Minutia website, The M4A4 Sherman. This is the best on-line reference for the details of the Sherman tank variants; not as much of vehicle combat history though http://the.shadock.free.fr/sherman_minutia/index.html. Sherman Vc Firefly, Armour PhotoGallery #13, by Wojciech J. Gawrych |
| Modeling the Sherman Tank in 1/72nd Scale |