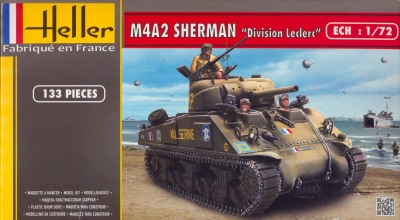
| M4A2 Sherman "Division Leclerc" |
Heller Kit #79894 |
| Article by Stephen Brezinski; last updated: 29 September 2016 | |
 |
|
| Modeling the Sherman Tank in 1/72nd Scale |
| M4A2 Sherman "Division Leclerc" |
Heller Kit #79894 |
| Article by Stephen Brezinski; last updated: 29 September 2016 | |
|
|
50 Shades of Olive Drab I do not often try to model a particular vehicle but when we have such a good start as the Heller M4A2 model, it was a pleasure worth the effort. So as to construct a reasonably accurate scale model of CHAMPAUBERT, I have found the best photo I could locate and broke it down into parts for closer examination. CHAMPAUBERT was an M4A2 with the 2nd Tank Company of the 501st regiment in the 2nd French Armored Division under General Phillippe Leclerc. This Free French division formed in North Africa and Britain, then landed in Normandy in late July 1944. The formation fought across France and into Germany with the US XV Corps, 6th Army Group. The terminology and information I will use comes from the reference book The Sherman Design & Development, Son of Sherman, Volume 1 and from Sherman Minutia website.
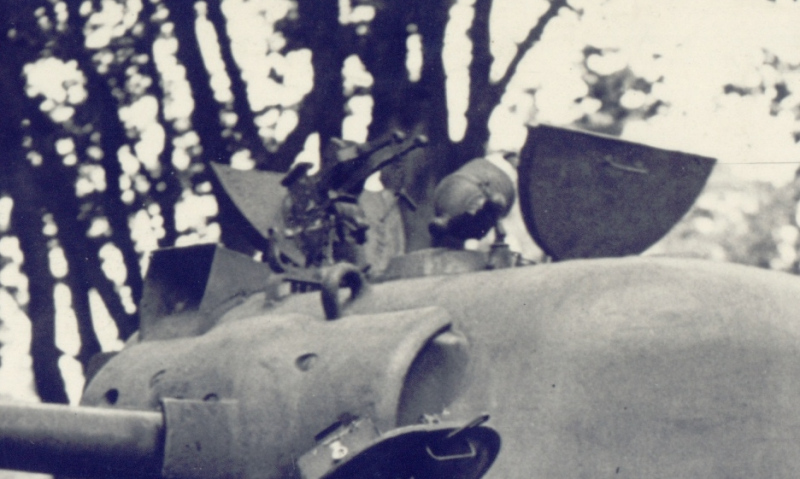
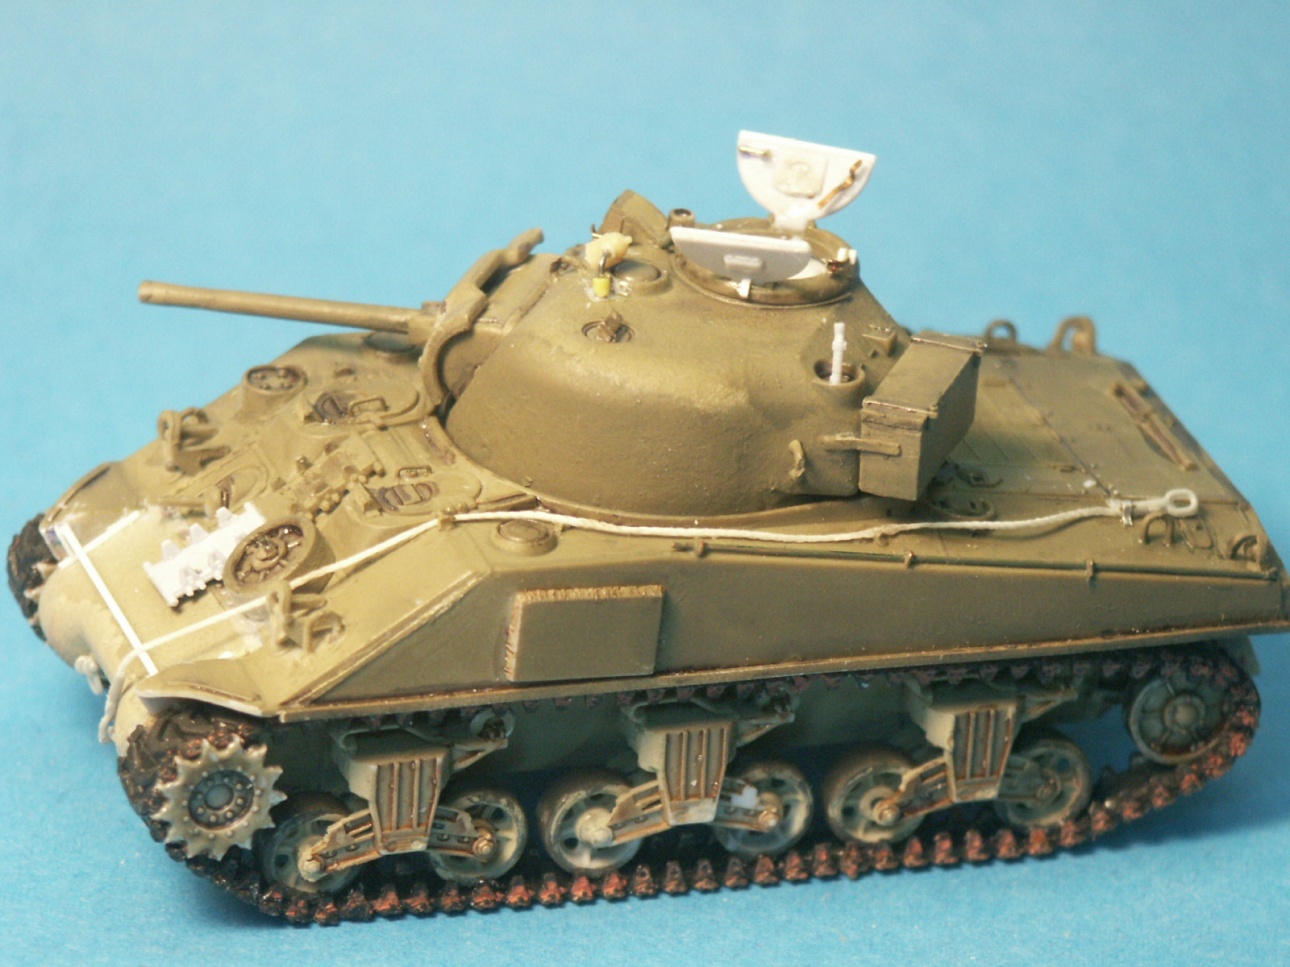
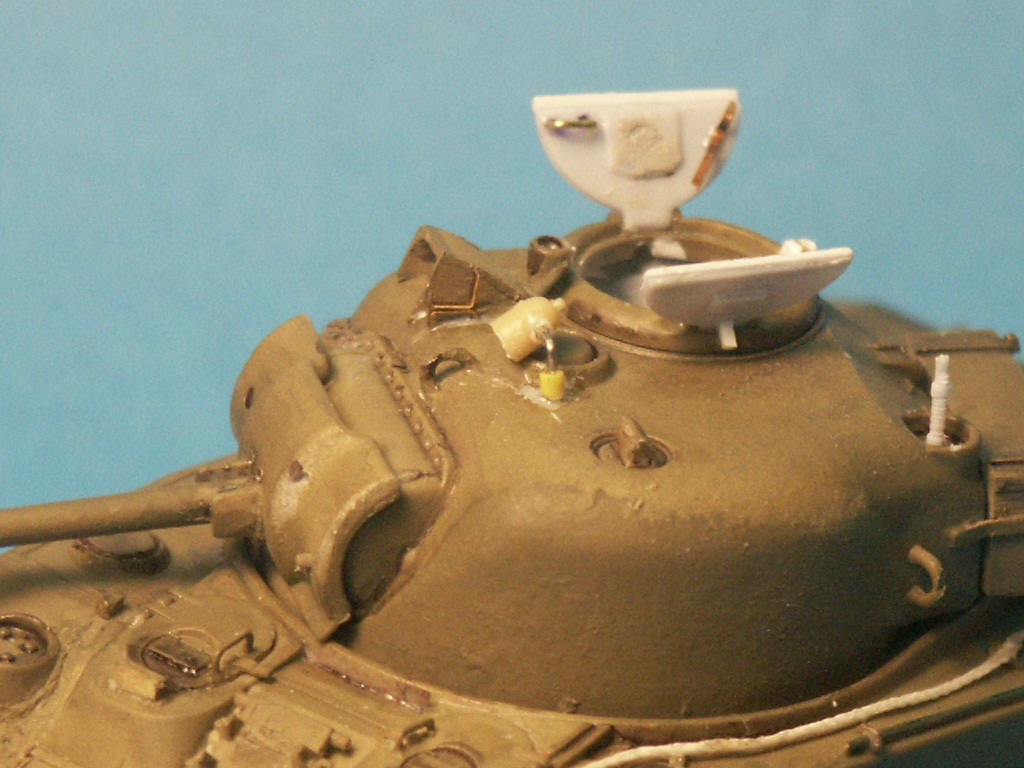
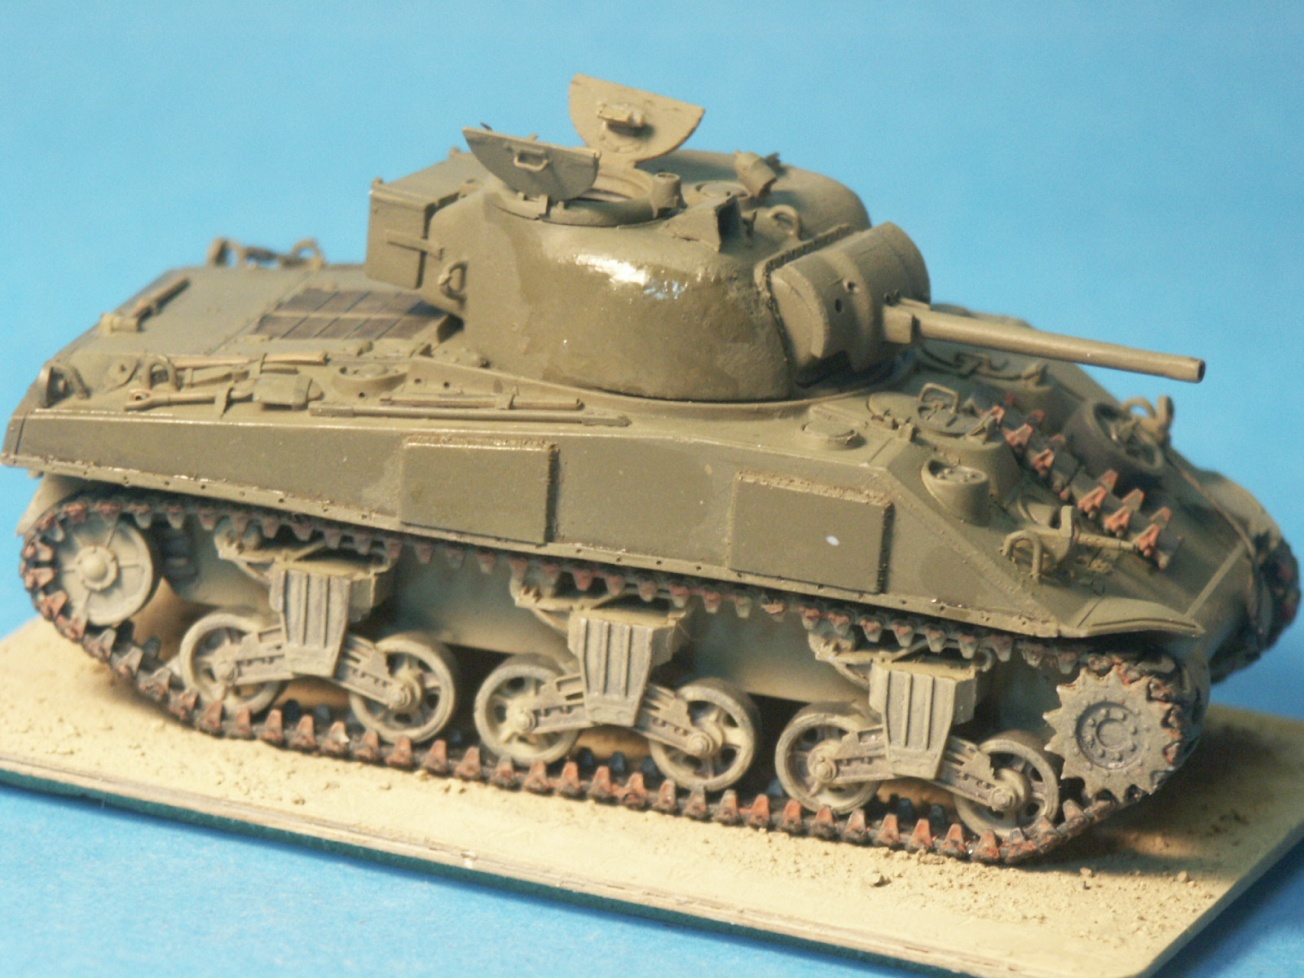
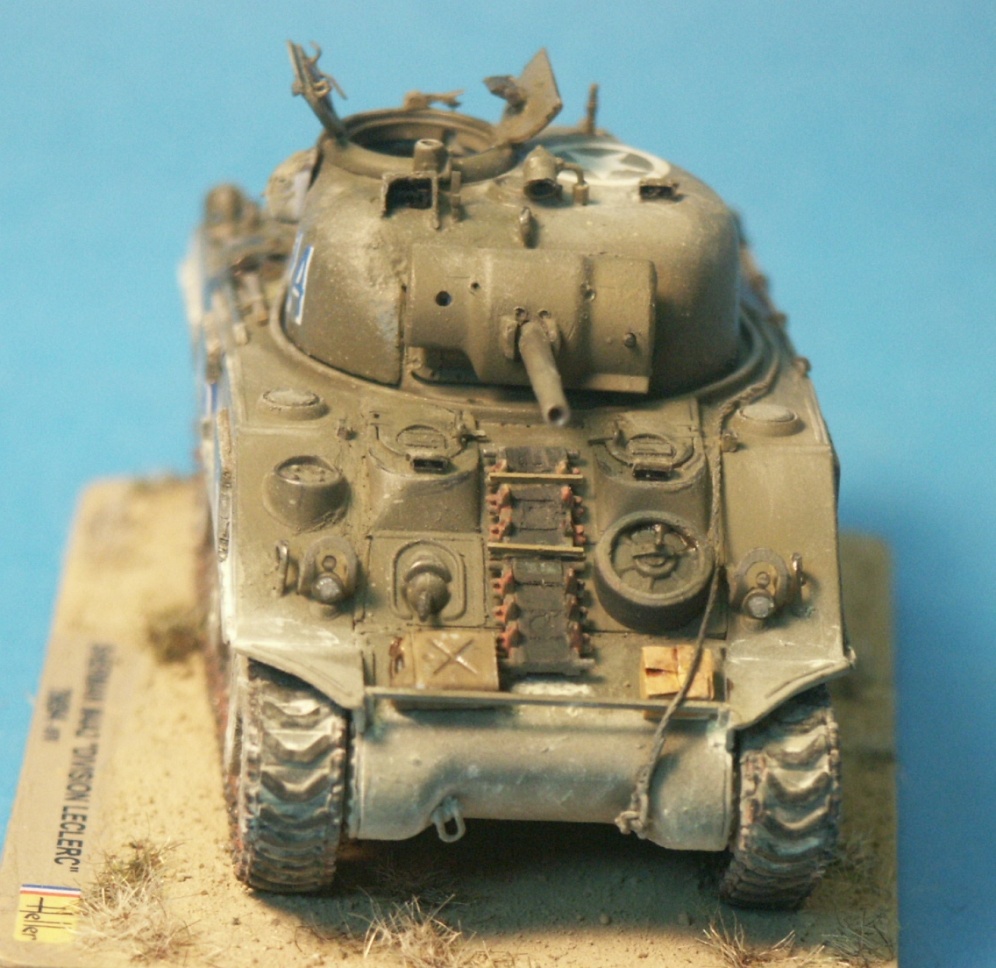
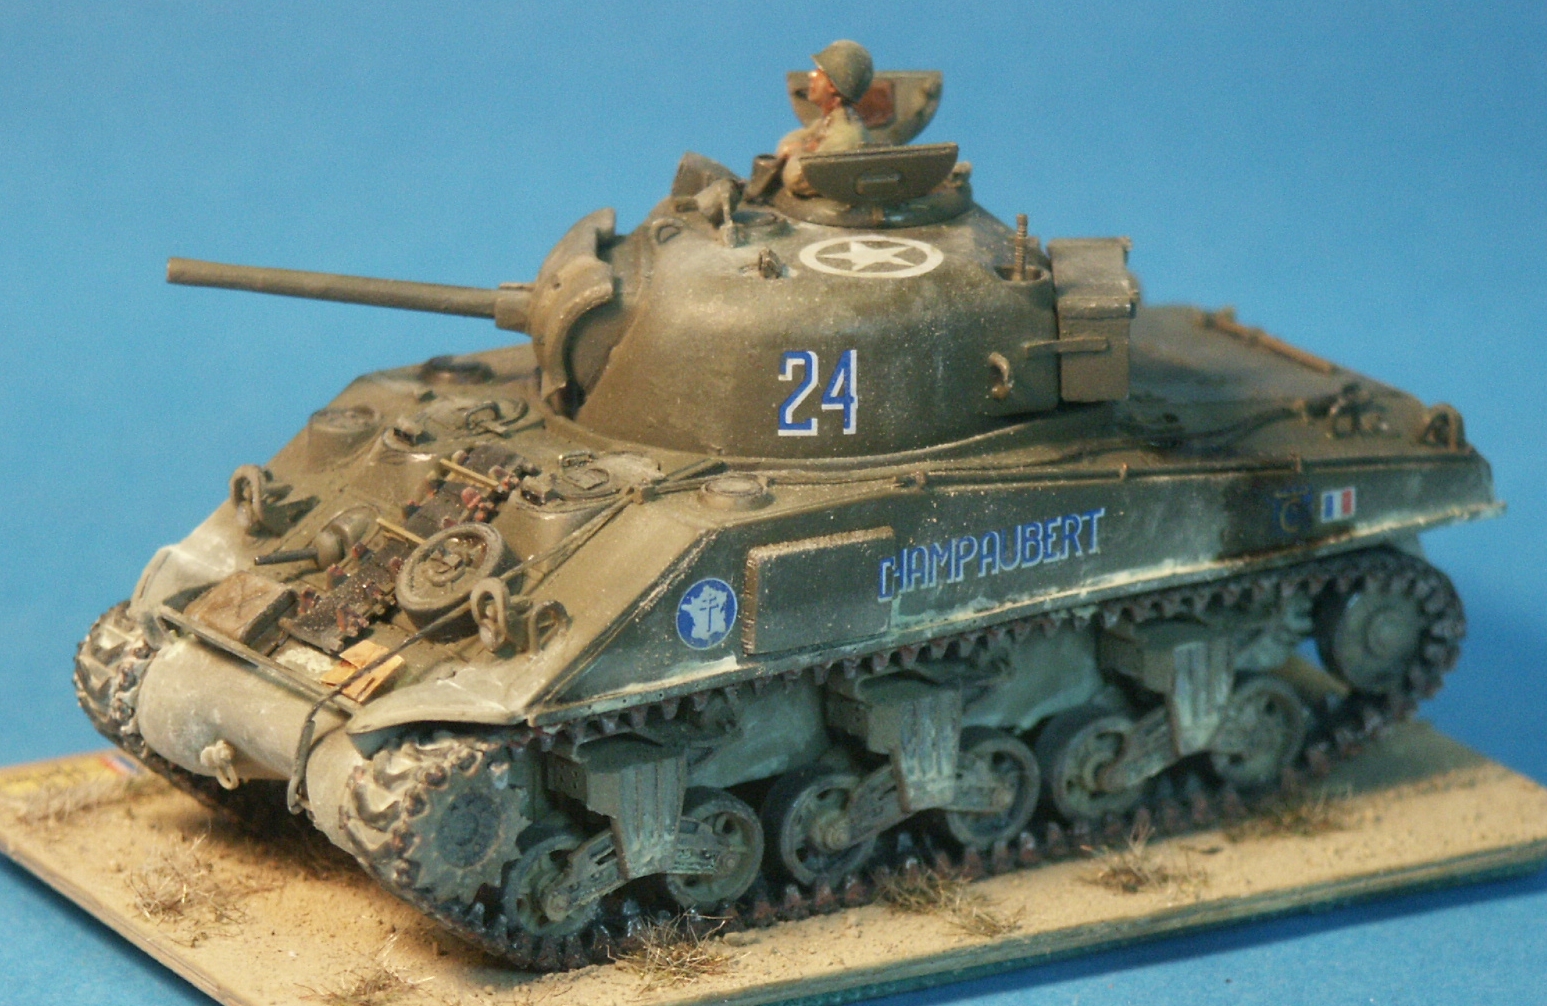
Starting at the top we'll look at some particular features of the turret. The commander's cupola is the split hatch type, open and angled slightly below vertical. In front of the hatch and next to the roof ventilation dome is a spotlight that was introduced to the Sherman in about spring 1943. This spotlight is not included in the Heller kit. Left of the spotlight looks to be a .50 caliber machine gun mount without the gun. I see no evidence of an oval loader's hatch or the hole for the 2-inch smoke mortar. The most interesting item by far is the unusual hood over the M4 periscope gun sight. I have never seen this hood before on any Sherman and I guess that it is a field workshop modification. To our right of this hood is the new commander's vane sight, introduced around October 1943. Both styles of the commander's rooftop vane sights are missing from the Heller kit. Notice the details of the commander's and the driver's hatches. At lower left is the M34A1 rotor shield (gun shield) for the 75mm M3 gun. Based on the features and the dates they were introduced, there is good reason to believe that this turret is the type with cast-in extra cheek armor on the right side introduced in spring of 1943, so it would not have the welded-on appliqué armor on the turret (kit part-C12), as portrayed by Heller's instructions.
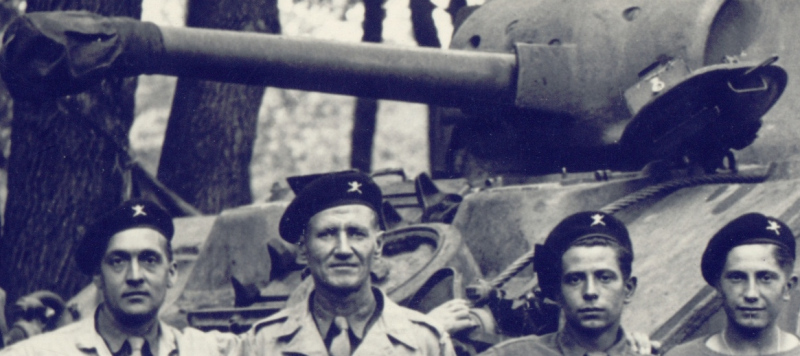
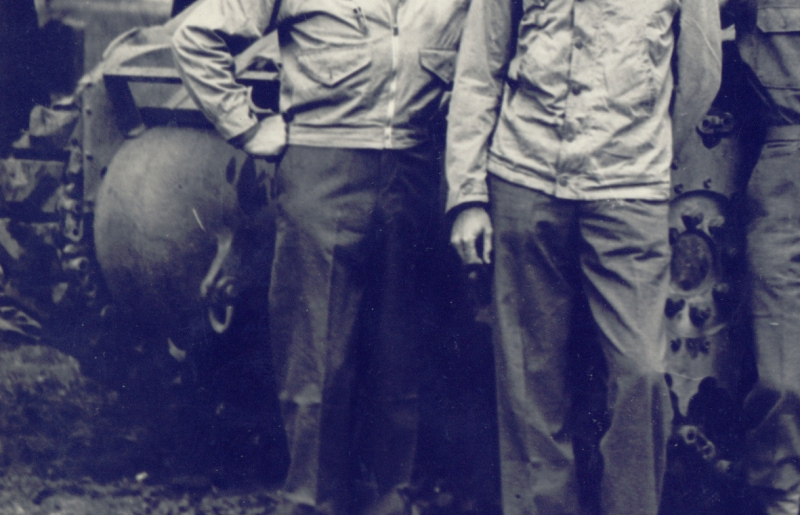
This photo shows some of the crew members of the tank CHAMPAUBERT. From left are driver Leo Jouhet, Georges Brice (a friend from another tank crew), next is Daniel Renou of the tank JENA and his brother George Renou. CHAMPAUBERT was destroyed in the Vosge Mountains in early October 1944. Three of the gentlemen above did not survive the war. After it was destroyed in combat the tank was replaced by CHAMPAUBERT 2. For details of the M4A2 we have another view of the M34A1 rotor shield, the cast driver's hoods, and the tow cable coming up over the glacis. We also have a good view of the driver's hatch, the angle the hatch sits when it is open, and the latch that holds it open. The latch is an identifying feature that could help us with figuring out a production period for the hull. Between the driver's hoods is a run of spare track. In front of the driver's hatch is a spare roadwheel which to me appears to be a 6-spoke stamped type of wheel. To the far right, behind George Renou, we can see the weld seam of the glacis plate, a feature missing from the Heller model. A grainy photo of CHAMPAUBERT found online shows it having five links. Despite having appliqué armor on the hull sides there is no appliqué armor plates welded in front of the driver's hoods. I have read this is common for Pulman Standard Car Company (PSCC) M4A2s. I have also read that many of the M4A2s produced by PSCC were issued to the Free French divisions. The kit painting and marking guide shows a number 30 within a yellow circle (decal-5) on the front of the cast driver's hood but in this photo there is no such marking.
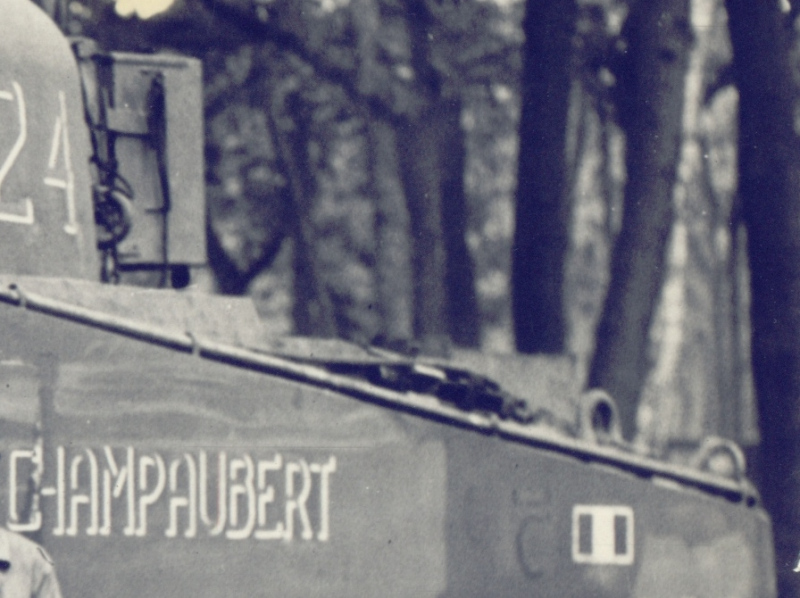
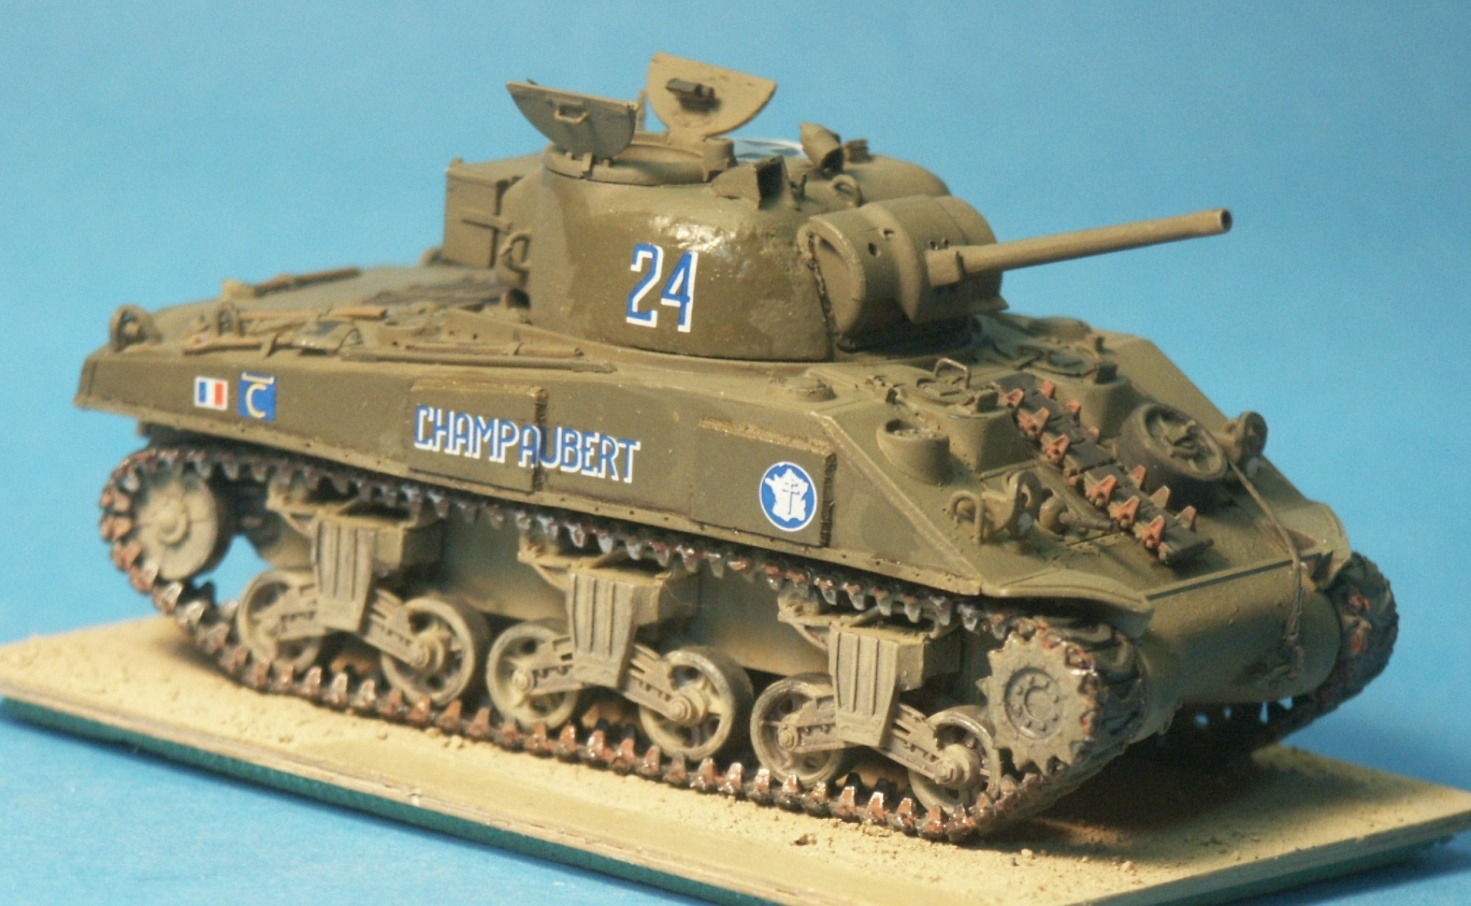
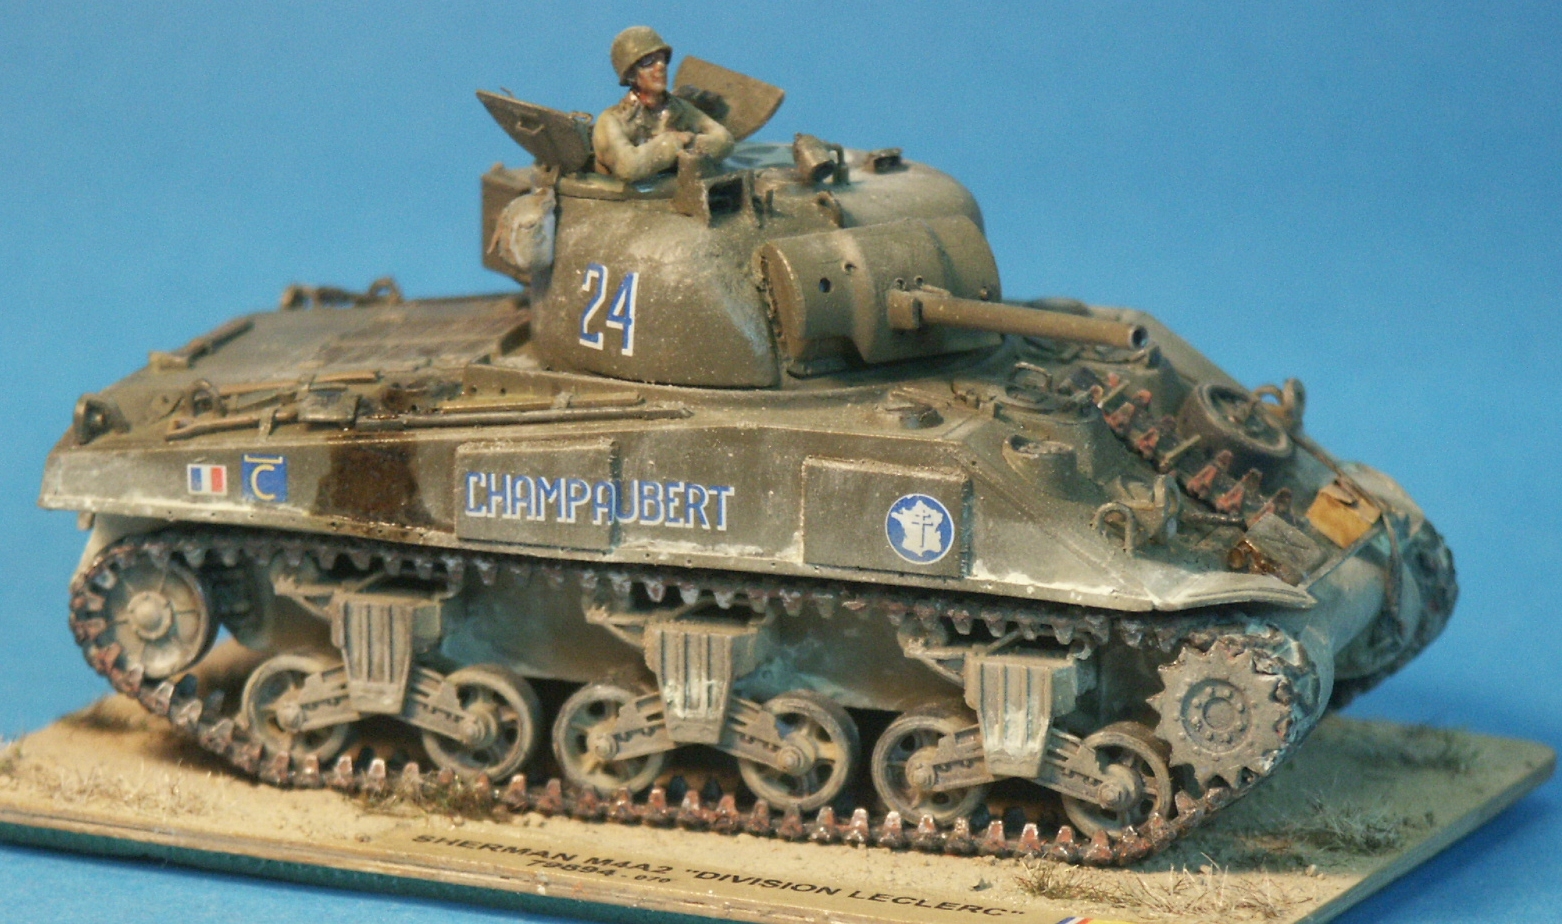
This view of the left rear quarter of CHAMPAUBERT shows a long rod strapped under thin bent rods. On the rear of the turret is a storage box which is included in the model kit (parts F15 & F16) but a strap affixing the box to the turret is not featured on the kit parts. Notice there is no pistol port on the turret; this is an important feature in dating and detailing the turret production. On the hull side we can see the tank name CHAMPAUBERT, a tactical marking for the second squadron, partially obscured by a diesel fuel spill, and a small French national flag outlined in white. The American US Army (USA) vehicle numbers have been painted out. The tank name and vehicle number 24 are portrayed in some references as white and blue like in the Heller kit decals, but the latest assessment is that the number and name are in white and green. So if we want more accurate markings we can perhaps purchase aftermarket decal marking? There is no raised grouser compartment cover at the rear corner of the upper hull which is a way to tell this is an M4A2 rather than a M4.
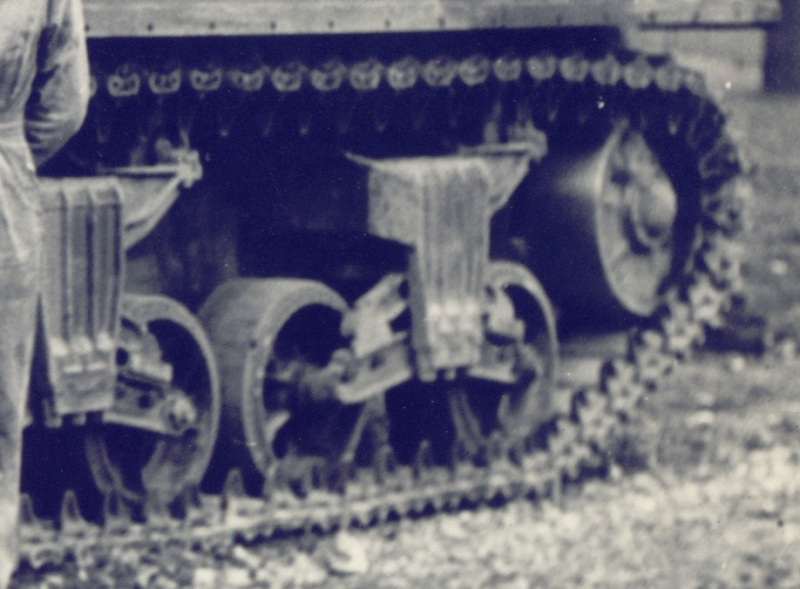
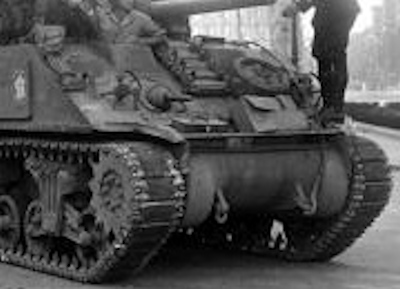
This view of the left rear quarter of CHAMPAUBERT showing the VVSS (vertical volute spring suspension) bogies with the open 5-spoke roadwheels. The suspension units are the type without the upswept trailing arm. The idler wheel is the stamped 6-spoke type. Notice how this all steel idler wheel has a metallic shiny surface, not rubber, which is something to keep in mind when painting the model. Notice above the track the sheet metal strip welded onto the hull to hold the sand skirts that the Shermans came with from the factory and most often promptly removed by the crews. The track has no sag like with German and Soviet tank track of the period. US M3 and M4 Medium and M3 light tank track is referred to as live track and the unconnected ends will curl a bit. When in good condition they will not sag.
This last photo shows that the track is the T48 rubber chevron type. Another photo of a tank stated to be CHAMPAUBERT shows what appears to be very worn type T51 flat rubber block track. Since the Heller M4A2 kit only comes with the T51 and the T54E2 steel block chevron track, we'll have to get aftermarket T48 track or exchange track with the Heller M4 kit. The sprocket wheel visible at far right is the economy or plain type. The final drive cover is a mid production one piece cast type, represented by part-B25 in the Heller kit. To the left of the crewman we see a square profile rod attached to the mudguard and running across the glacis; I surmise this rod can hold stowage, act as a step for mounting the tank, and braces the mudguard.
This is the only front view of CHAMPAUBERT that I have found. I do not know if this photo is earlier or after the photos above. The rubber block track appears extremely worn. All of the markings on the front depicted in the Heller kit instructions appear to have been painted out, which I understand was not an uncommon thing to do.
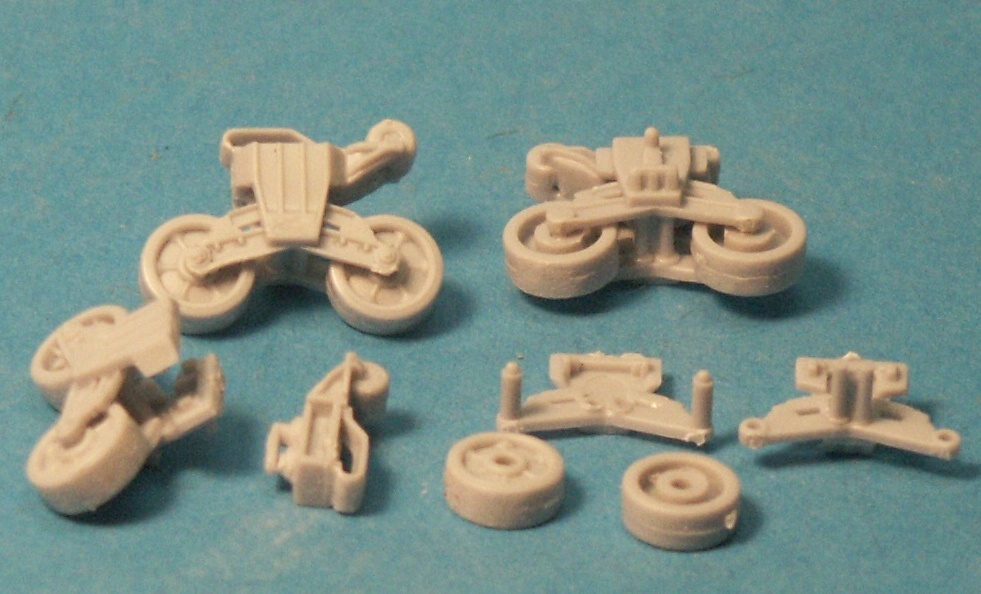
Here are the Heller VVSS (vertical volute spring suspension) bogies in various stages of assembly. At lower right are the five parts that make up each suspension bogey. The parts assembled well after clean-up with a sanding stick and sharp blade. The roadwheels here are the stamped six spoke style (parts-A4) which is not the type used on CHAMPAUBERT, so I will have to exchange them for the kit's open 5-spoke roadwheels (parts-B6).
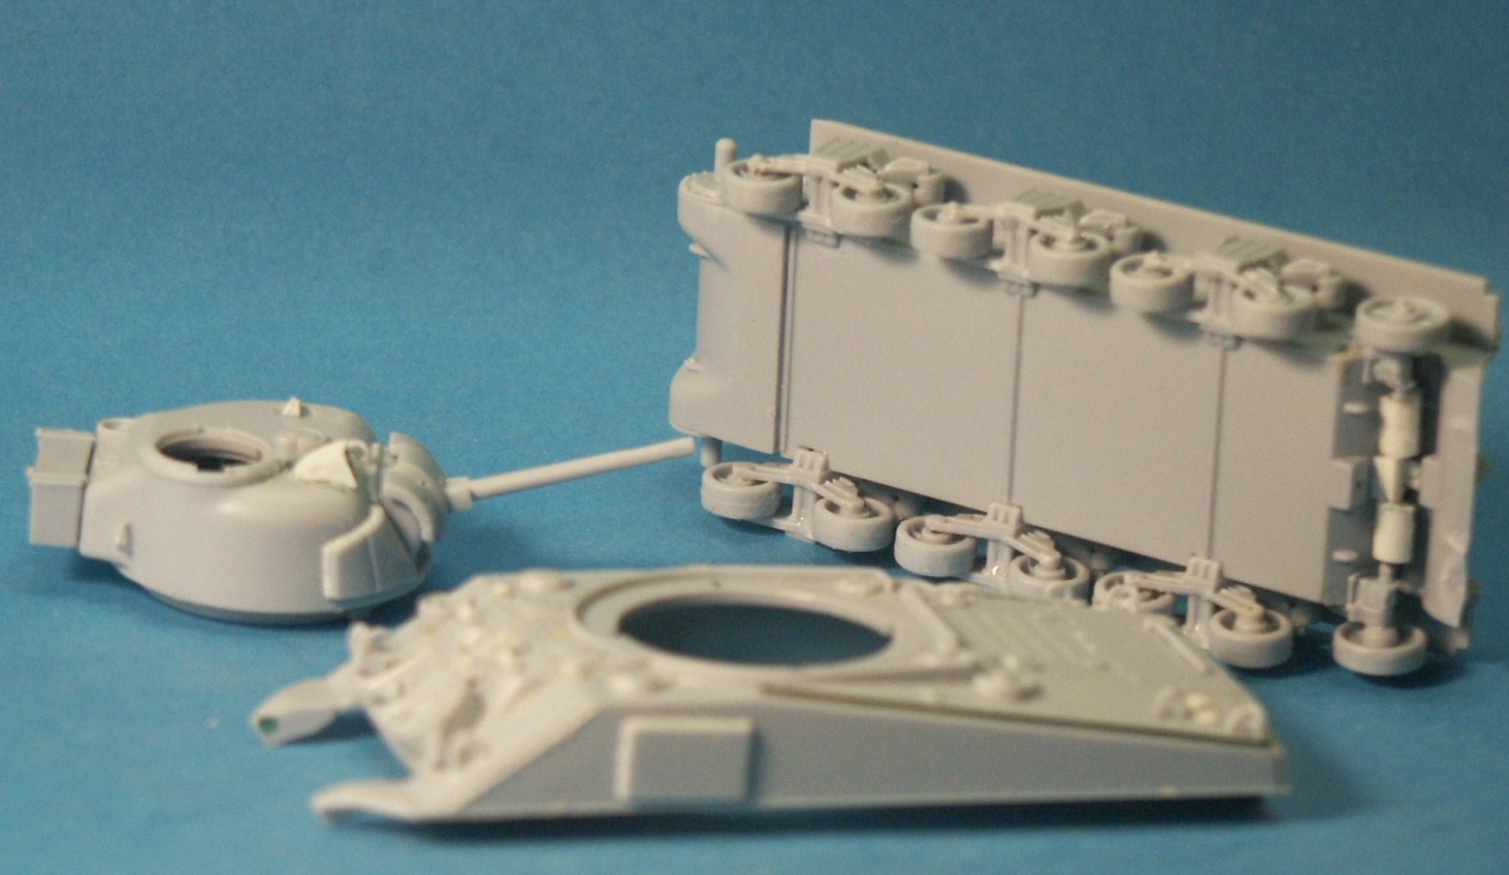
I assembled the model into three subassemblies for painting. During assembly I found the exhaust system (part-F2) to be so nice that I opted to save it for another model kit and scratchbuild one since it cannot be seen well under the exhaust deflector. At the rear of the hull under the exhaust deflector is my scratchbuilt exhaust. The bottom of the hull is lacking many engine access panel features of the M4A2 hull; my M4A2 will be mounted on a base so I will not make the effort to detail the bottom.
Now with the correct roadwheels. Modifications made at this point is the building of a hood over the M4 gunsight periscope, the long rod on the left side of the hull edge, the flat grouser compartment covers, and the opened periscopes. On the right side of the turret is the appliqué cheek armor (part-C12) glued on. After I assembled the turret is when I determined that, based on research in Son Of Sherman, this turret did not have the welded-on armor. A turret of this production with the spotlight and vane commander's sight, likely has the cast-in extra cheek armor. On the hull side by the front glacis is a weld bead simulated with a thin strip of styrene. In the turret ring and fuel cap splash guard are drain holes drilled with a fine pin drill. At the rear corners I have replicated the grouser compartment covers with some sheet styrene. Remember this upper hull is shared with the Heller M4 model kit. Besides the engine deck, a difference between the M4 and M4A2 is that the M4 has the teardrop shaped grouser compartment covers. Heller's M4A2 instructions tell us to shave this vented cover off. The M4A2 cover is a simple oval plate with a bolt holding it down. About these vent covers, I found out recently that on gasoline engine Shermans this compartment for storing the track grousers tended to collect gasoline vapors (not "fumes" which is incorrect terminology in this case). The diesel fueled M4A2, and the M4A3 also, did not need the raised vents over these small compartments.
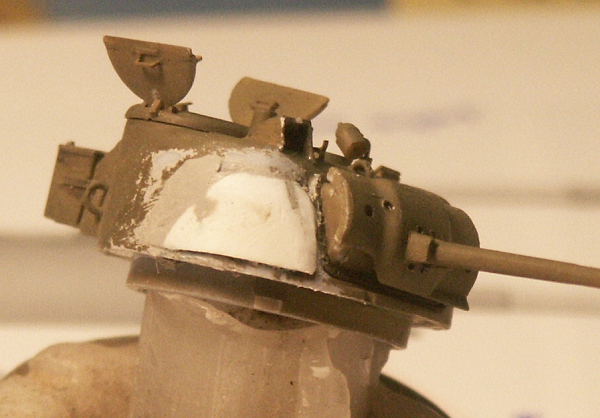
It is hard to see but the turret and gun rotor shield (part B20) have been coated with Mr. Surfacer 500 to simulate a cast steel surface. Left of the gun shield is welded on appliqué cheek armor (part-C12) which I will have to remove to replace with scratchbuilt cast-in turret cheek armor, this shows I have to do my homework before assembly starts. The weld beads on the glacis plate have been corrected by sanding off some and replacing them with thin styrene strip. The kit's weld beads on the glacis I found too prominent so have been sanded down. With carved wedges of styrene the periscopes have been modified to be portrayed open. Based on my reference photos a spare stamped 6-spoke roadwheel is mounted on the glacis immediately below the driver's hood. It is interesting but not surprising that this style of spare roadwheel was used, a different style from that used in the suspension of CHAMPAUBERT. At the bottom of the side under the appliqué armor is a narrow styrene strip representing the sheet metal strip for attaching sand skirts. The molded plastic headlight guards are better than having none, but not nearly as good as etched brass guards. I used them to see how they would look since this is an assembly review of this kit.
The base coat of acrylic olive drab (OD) was painted over the upper surfaces and a light dust color painted over the lower hull and suspension. I like The Detailer water based Black It Out and Brown It Out for a dark wash under tools and recesses, we can wipe excess off with a damp paintbrush even after it has dried. After the vehicle is assembled the painting will be touched up and blended in. The assembly instructions say to connect the ends of the soft plastic band tracks with super glue (cyanoacrylate) but I found the super glue took a long time to dry, to cure, and adhered terribly. The tracks fit tight around the wheels and I had a great concern that when pulled tight the bond connecting the track ends would fail, or the rubber itself would break like I've found a habit with Trumpeter band track. After several attempts of gluing, cleaning and clamping the tracks were super-glued with the track ends glued together around the sprocket wheel so the stress would be off the bond. To prevent the track face from dimpling in around the sprocket wheel from the snug fit of the soft rubber track, blocks of styrene were glued around the inside of the sprocket wheel to support the track from underneath.
After the base coat of Model Master Olive Drab acrylic paint and the hull parts glued together the fine delicate parts were attached. The tow cable was produced with course thread that was stiffened with white glue attached to ends taken from a Dragon M4 kit. With the dark wash applied, the simulated weld beads around the appliqué armor plates are more visible; simulated with a sharp knife tip and some liquid cement to soften the knife marks.
Fine details added at this point include the vane sight in front of the commander's cupola, made from a strip of brass. The spotlight was taken from an ESCI M4A1 kit but the mount was rebuilt with some wire to make it appear more in-scale. On the open hatch, grab handles and latch handle have been added and an ejector pin mark on the pad on the hatch underside filled in. On the rear of the cupola ring a barrel bracket for the .50 calibre was scratchbuilt.
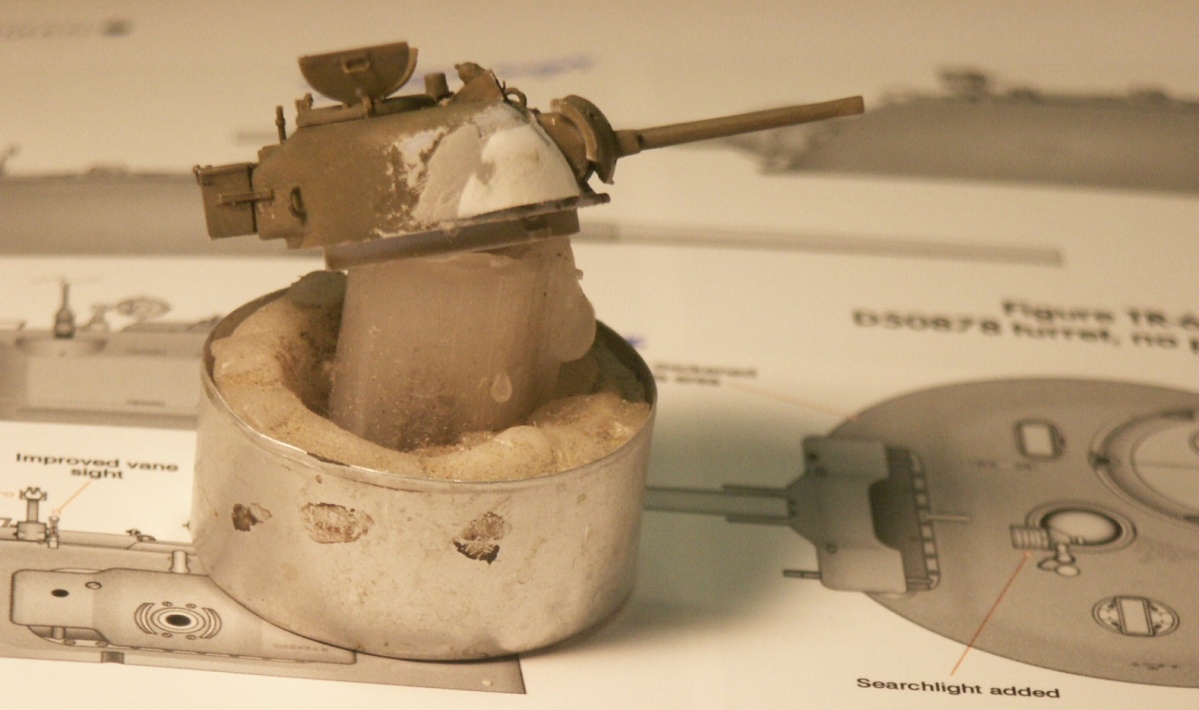
Using the drawings and photos in my references the cast-in cheek armor was built into the turret using styrene sheet and model putty the sculpted into shape. Notice the cheek armor does not go all the way to the bottom of the turret, leaving room for it to still fit within the turret splash guard. After the plastic was satisfactorily contoured it will get a coating of Mr. Surfacer 500 for a simulated cast texture.
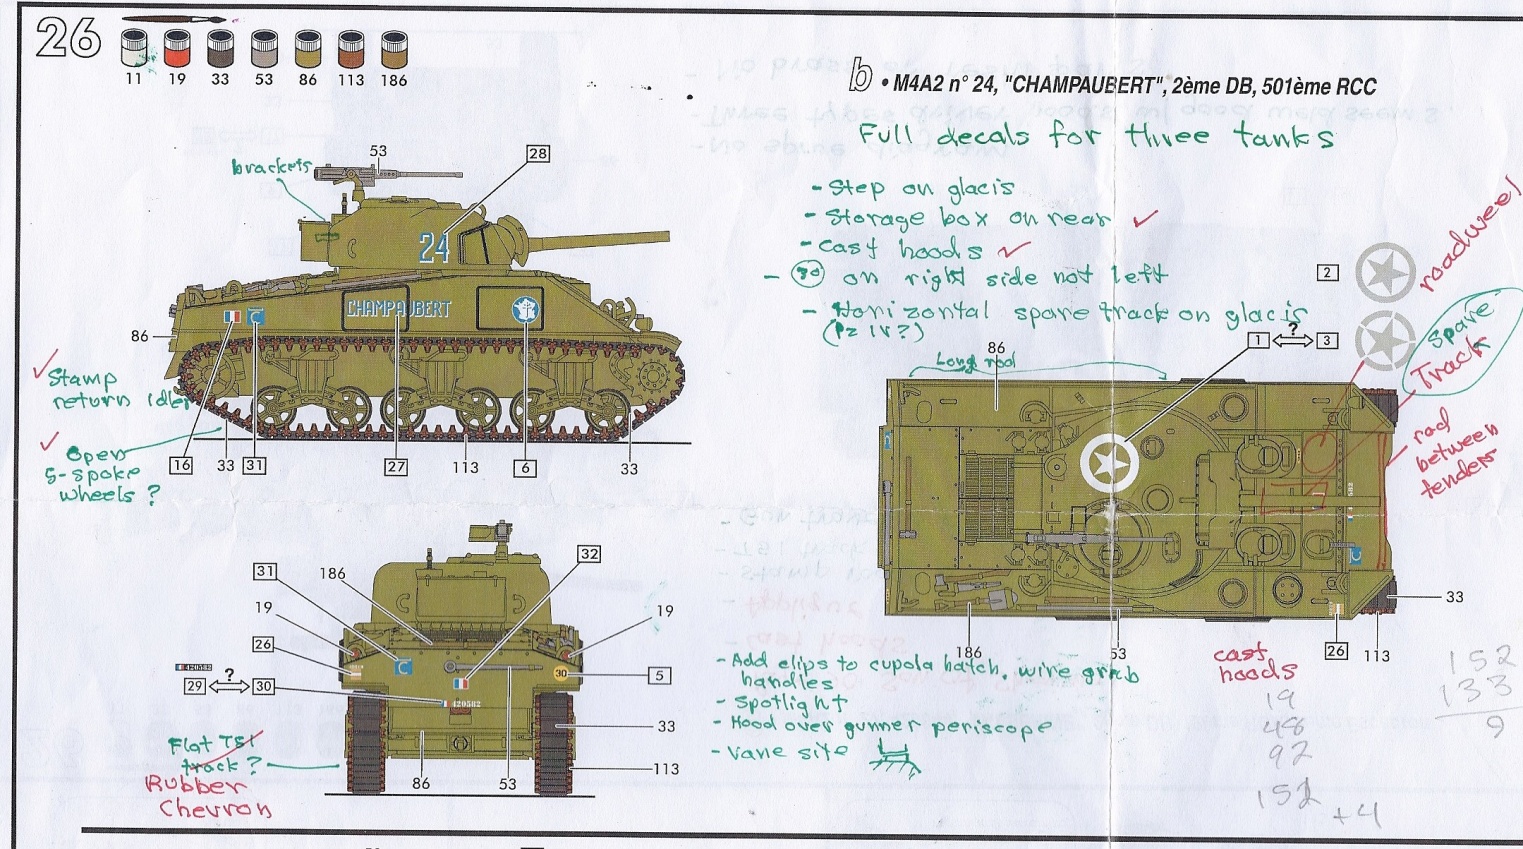
Painting & Markings Like many Allied AFVs in the Northwest Europe theatre of the time they came in a monotone olive drab color and commonly stayed that way through their lifetime. This M4A2 was given a coat of Model Master acrylic paint on the upper surface and a coat of light dust color on the suspension and lower hull.
At this stage a 2nd coat of Model Master olive drab has blended in the dark wash. Clear acrylic floor polish is hand painted over the areas to receive the decals and left to cure overnight.
These two scans show the kit painting and marking diagrams for CHAMPAUBERT with all my pre-assembly and painting notes.
This 30 in the yellow circle (decal-5) is a bridging marking, indicating 30-tons. I have seen this marking on US Army Shermans also. I find it interesting that we have a choice in white stars (decals 1 or 3) and choice in styles of number plates (decals 29 or 30). I presume this means that the historical photos were not sufficient enough to know which versions were correct? Comparing the applied decal markings to my historical photos it looks to me that some of the kit markings are a little too large, but not unacceptable to me.
The decals applied very, very well over the clear gloss coat. The decals did not need a long time to soak and move off the paper, they were flexible, snuggled down over the uneven spots like the appliqué armor, and with a soaking of Microscale Micro Set decal setting solution they settled in with no air bubbles or visible edges of the clear film. The decal CHAMPAUBERT had a soaking of Solvaset setting solution to help it settle down over the appliqué armor plate. The complete application of the markings recommended by the instructions makes for a very colorful Sherman. Based on one photo of the front and left quarter, the markings were left off the front; it is possible they were once present there but perhaps were later painted over in the interest of vehicle camouflage. I have no photo of the rear of CHAMPAUBERT so gave the Heller instructions the benefit of the doubt and added the decals here, also it makes for a more colorful model.
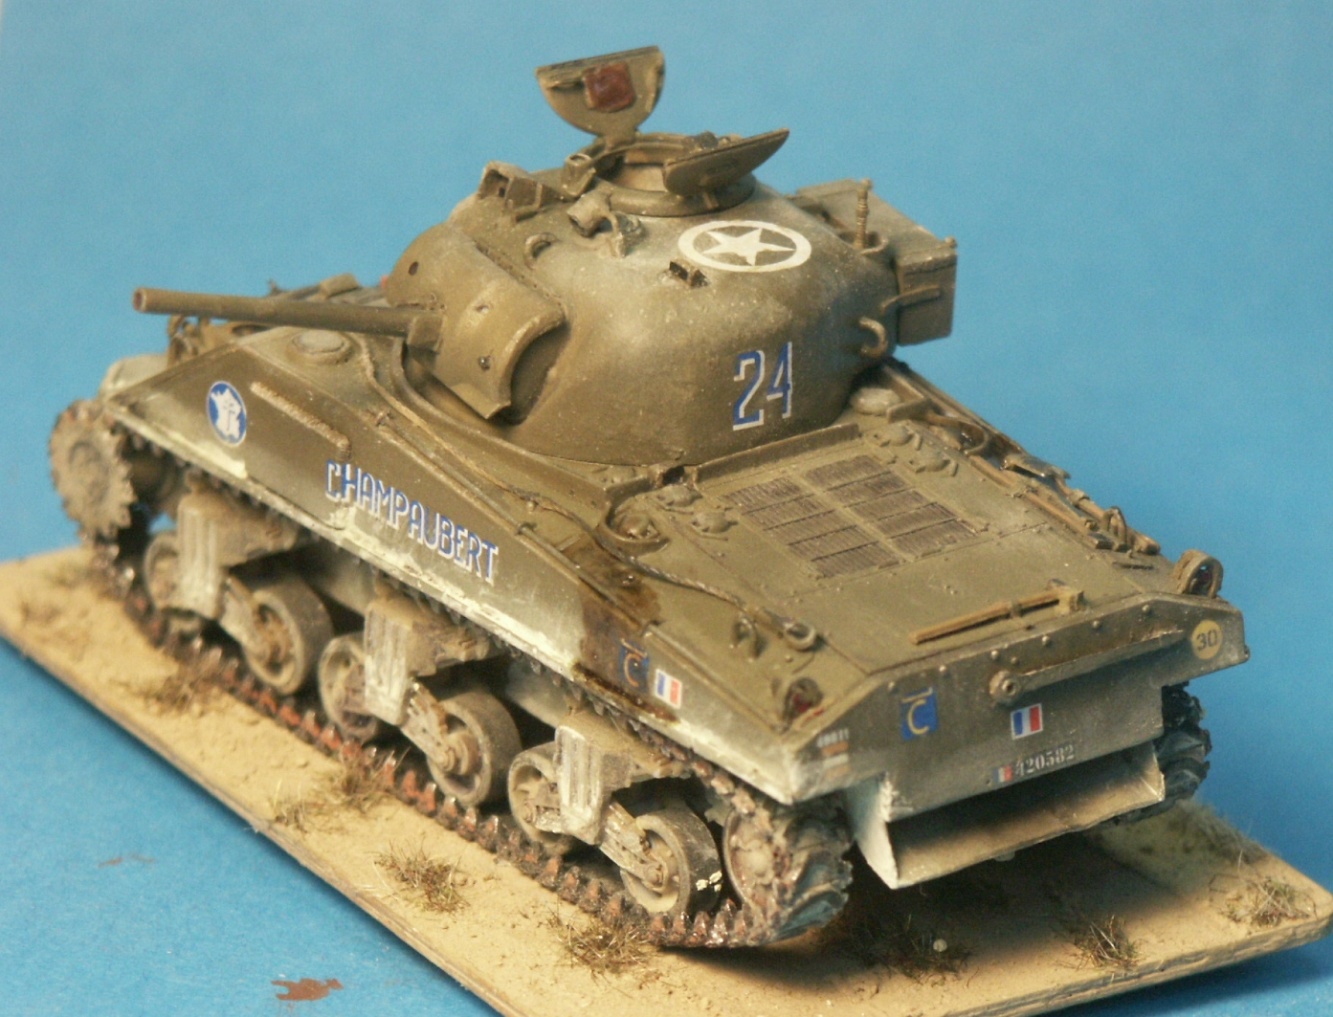
The diesel fuel stain on each side is simulated with an oil-based wash of brown and black artists oil in turpentine. The turret ring and fuel caps splash guards have rainwater drain holes that channel the fuel spill in predicable directions.
After completing the model to this stage I studied my reference photo some more (a dangerous thing to do after you finish a model) and I am pretty sure that there is another, lower, metal bar or rod across the glacis. When first studying the photos I had thought it was a shadow of the bar above.
The base is made from old plastic card like those used for library and credit cards, that is covered in landscaping grit (soil) and painted a summer dusty color. In the lower right is the kit name and manufacturer taken off the decal sheet (with a collection of 20 Shermans it is nice to get help in remembering information about the model).
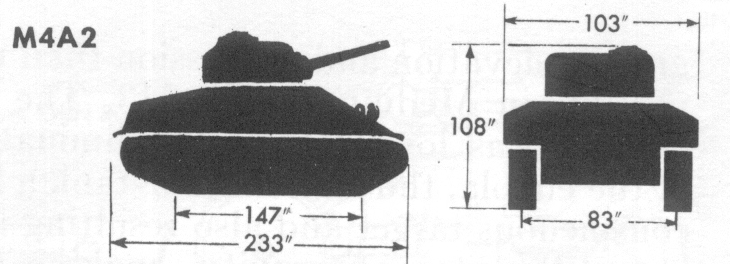
The figure is a Milicast tanker figure wearing a US Army steel helmet, common for US and French tankers sticking their head out of a hatch. Kit Scale I don't typically delve into the touchy subject of a kit's scale, but knowing it can help in switching parts with other kits for example, or matching the vehicle to figures, I'll take a crack at it. Using the measurements in the profiles below converted to metric, and a good metric scale I found my assembled Heller M4A2 to be 1/72 scale in hull width, about 1/73 in overall height, and about 1/74 in hull length, good enough for me. The Heller hull compares in size reasonably close to the Dragon M4A2 hull. Determining scale based on someone else's measurements is always hard. Questions to consider: were the width measurements taken with the sandskirts on or off and does it include the appliqué armor plates or not? Was the height measured with an unloaded vehicle, or fully loaded with ammunition and fuel, or with a worn suspension with sagging springs? Was the length measured with the rear mudguard on or off?
Conclusions My opinion is that this is one well engineered and pleasant to build Sherman model in small scale. The fit is very good, the scale looks good, detail is very good. The track material is a small disappointment. While the tracks have great detail they did not take to the model glue or the super glue well, but they were eventually secured. The headlight guards would be better in etched brass but I would rather have plastic ones than none at all. I do hope that Heller releases M4A1 and M4A3 Shermans as well. References In Box Reviews of Heller's new M4A2 Sherman kit at: http://www.172shermans.com/kitreviews/Heller/SBrezinski_M4A2_prev.htm http://www.172shermans.com/kitreviews/Heller/M4A2_prev.htm The Sherman Design & Development, Son of Sherman, Volume 1, by The Ampersand Group Inc. (2013) M4A2 Sherman Part 1, by Woljciech J. Gawrych, Armor Photogallery #11. Sherman Minutia website http://the.shadock.free.fr/sherman_minutia/index.html http://www.chars-francais.net/2015/index.php/classement-individuel/m-4-sherman CenturyTracks No. 1, French Shermans of the Liberation, book by C. Gillono (2006) |
| Modeling the Sherman Tank in 1/72nd Scale |