Modeling the Sherman Tank in 1/72nd Scale
 
1/72nd Scale M4 Sherman VVSS - Sprocket Wheel & Track Compatibility
Article by Doug Chaltry; last updated 21 April 2016
Frankensherman! Shermanstein! Shermongrels! Shermélange! Sherman Medley!

Many modelers like to mix and match various parts between different model kits. Sometimes it's because we have many spare parts that we don't want to go to waste; sometimes it's because we want to make something that is not available in kit form; usually it's because many kits can be improved by combining the best parts from several kits and aftermarket accessories. Regardless of the reason, it is frequently quite an enjoyable experience, giving the builder a sense of satisfaction of creating something unique and complete. However, it can also be the cause of immense frustration due to the fact that no two kits are the exact same scale (this is where fractions of a millimeter matter), and the ill fit of the menagerie of parts can be enough to drive one to drink.

Some of the most common aftermarket accessories available to us are wheels and tracks. Adapting wheels to fit a strange kit is usually not too difficult a task. But tracks can be problematic due to a number of factors, such as: the space between the front and rear sprocket plates, the thickness of the sprocket plates, the distance between the sprocket teeth, the width and pitch of the track shoes, the size of the end connectors, and the size and location of track guide teeth.

This article is intended to address the many compatibility issues between the various sprocket wheels and tracks that we have to work with. It also includes specific discussions around the use of the aftermarket tracks and sprocket wheels from OKB Grigorov, due to the rising popularity of these high quality resin parts.

Sprocket Wheel Attributes
First, here are some very general observations on the various sprockets that are available to us, both kit parts and aftermarket. In the table below, I have scored each sprocket wheel in three categories. Scores are from one to five stars, with five being the best.
  • Cleanup: Ease of removal from sprue, along with the amount of necessary trimming/sanding.
  • Assembly: Some parts are keyed for easy alignment between front and rear sprocket plates; the tighter the keys, the better.
  • Molding: This is the overall appearance of the completed sprocket wheel, and includes the level of detail, accuracy and quality of material.
  • Width: Distance between the front and rear sprocket plates, measured from the outer face of the plates. The reference drawings that I have are contradictory (not perfectly drawn to scale), but based on the most common measurements, in addition to comparison with track widths, I believe this measurement should be about 5.7mm in 1/72nd scale.
Manufacturer Cleanup Assembly Molding Width Comments
Dragon ***** **** ***** 6.5  
Eduard/ExtraTech ** ** *** 5.6 Numerous sprue attachment points may result in damaged sprocket teeth. No keys to align front and rear sprocket plates.
Heller **** *** ***** 6.0  
Italeri/ESCI ***** **** * 5.5 Short one sprocket tooth.
Mirage ** ***** *** 5.8 Heavy sprue attachment points result in damaged sprocket teeth.
MR Models ***** ***** ***** 6.3  
OKB Grigorov **** ** ***** 7.0 No keys to align front and rear sprocket plates.
Revell **** **** *** 5.9  
Trumpeter *** *** **** 5.6  
UniModel ** ***** **** 6.0 Heavy sprue attachment points result in damaged sprocket teeth.
Attaching Sprockets to Hull

As you can see in the above image, most of the available sprocket wheels have holes on their rear faces to fit onto pegs on the kit hulls. Most of the holes are approximately the same diameter, so it should take only a little bit of enlarging some holes or pegs to make the parts fit. The exceptions are the metal MR Models piece and the plastic Dragon piece (both on the right side of the image), which have pegs on the rear of the sprockets. The Dragon piece is actually a peg within a hole, because it fits into a tube on the kit hull, which would make fitting other kit sprockets onto the Dragon hull a rather interesting exersize. I find it curious that the MR Models part has a peg on it, because these are meant to directly convert ESCI (now Italeri) kits, which have pegs on the hulls.

The OKB sprocket is in the lower left of the scan. You can see how the rear of this piece is wide open. It will be more complicated to make this fit onto kit hulls. Fitting to Dragon hulls may be the easiest. You could glue it onto the end of the tube on the hull, though this may not provide a very strong join. Better yet would be to drill a hole into the center of the hub, insert a rod of the appropriate length and diameter, and it would fit onto the Dragon hull just as the Dragon sprocket does (you would probably have to shorten the length of the tube).

For other kits, those with pegs on the kit hulls, you will need to drill a hole into the center of the OKB hub to accomodate the hull pegs. But, looking at the following image, you can see how recessed is the rear of the OKB hub (this depression is about 2.5 mm deep out of the package), so will the hull pegs be long enough?

The OKB hubs need to be shortened a small amount to fit all of the available tracks (see discussion below). Therefore, shaving off some of the rear lip of the hub before attaching the rear sprocket plate will reduce the depth of this depression in the rear of the hub.

If this is not enough to accomodate the kit hull pegs, I can think of two options:

  • Remove the peg from the hull, drill a hole into the hull and the rear of the OKB hub, and insert a rod of the appropriate length into both holes.
  • Fill in the entire depression in the rear of the OKB hub with either plastic or putty, and then drill a hole into it of the correct diameter for the hull peg. Using putty to do this may not result in a strong enough connection, however, so care must be taken.
Swapping Sprockets and Tracks
This table is for those of you who want to mix and match your various sprocket wheels and tracks from different manufacturers. Due to the size differences between both tracks and sprockets, there will usually need to be some modifications done to the sprocket wheels to make specific tracks fit. The numbers on the table indicate the amount of adjustment that needs to be made to the width of the sprocket wheel to accomodate each track. This adjustment can be accomplished by altering the length of the wheel hub (the cylinder between the two sprocket plates). I've rounded the estimated adjustments to the half millimeter for convenience. Being more precise is not necessary. Notice that the amounts shown on the table are not exactly what would be expected by looking at the sizes on the above table. This is due to variances in the width of individual sprocket plates, width and length of the individual track shoes and end connectors, as well as some track teeth interfering with proper fit.

Key:

  • 0 = no adjustments necessary;
  • X = This track/sprocket combination will not easily work, usually due to the tracks being too large for the end connectors to fit between the sprocket teeth. For resin or hard plastic tracks, perhaps some time-consuming carving may overcome the problem, but it's likely not possible for soft plastic tracks.
  • +0.5 or +1.0 = a spacer should be added between the two halves of the sprocket wheel of the indicated amount (in mm) to make it wider.
  • -0.5 or -1.0 = this amount (in mm) should be removed from the hub cylinder to make the wheel narrower.
Sprocket Track
Dragon Eduard Heller Italeri Mirage MR OKB Revell Trumpeter UM
Dragon 0 -0.5 -0.5 -1.0 0 -0.5 ?? -0.5 -0.5 X
Eduard/ExtraTech X 0 +0.5 0 +0.5 +0.5 ?? +0.5 0 X
Heller X 0 0 X 0 0 ?? 0 0 X
Italeri/ESCI +1.0 X +0.5 +0.5 +1.0 +1.0 ?? +0.5 +0.5 X
Mirage +0.5 0 0 X 0 0 ?? X 0 X
MR Models +0.5 0 0 X 0 0 ?? 0 0 X
OKB Grigorov X -1.0 -1.0 X -0.5 -1.0 ?? -1.0 -1.0 X
Revell +0.5 0 0 0 0 0 ?? 0 0 X
Trumpeter +1.0 +0.5 +0.5 0 +0.5 +0.5 ?? +0.5 0 X
UniModel +0.5 0 0 -0.5 0 0 ?? 0 -0.5 X
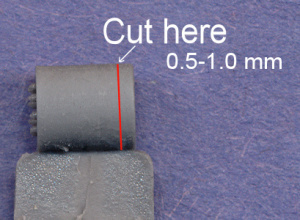
Caveat!

These numbers are based on my measurements and test fitting without glue. Please keep in mind that I have not actually built all of these combinations, so when cutting plastic, you should do a little at a time and constantly test fit, so as to not take off too much. If anyone has undertaken any of these surgeries and came to different conclusions than what I have listed here, please let me know.

Notes:

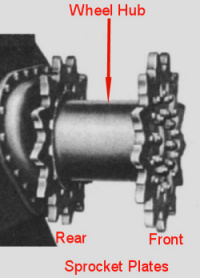
The Dragon tracks do not work on several of the available sprocket wheels because the pitch is too big on the track shoes (2.5 mm - should be 2.1 mm), resulting in each track run also having too few track links (71 links versus the correct 79).

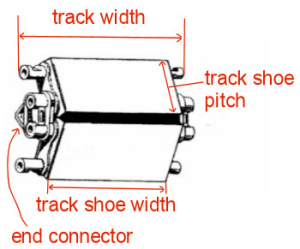
The Eduard/Extratech tracks are hard plastic link and length. On the individual links, the track teeth are molded onto the end connectors (just as they should be), but on some sprockets, these teeth get in the way of the sprocket plates, and may need to be removed.

The Italeri/ESCI tracks have very short end connectors, and this poses a problem when fitting to the sprockets. If the track shoes fit between the sprocket plates, the end connectors won't grab the sprocket teeth properly. But if the end connectors fit into the sprocket teeth, the track shoes are then too wide. Notice that the lack of one sprocket tooth does not necessarily hinder the fit of many of the available tracks.

The Revell tracks are hard plastic link and length. The individual links are slightly narrower than the links that are part of the longer track runs. The end connectors are also slightly larger on the individual links, and in many cases need to be cut down some to fit into other manufacturers' sprockets.

The hard plastic link and length tracks from UM don't fit correctly on any sprocket wheel, even UM's own piece. The track shoes are much too narrow, leaving the end connectors (and the teeth molded on to them) too long. Even if the sprocket teeth fit between the track's end connectors, as they do on UM's sprocket wheels, there are large gaps between the inside of the sprocket plates and the edges of the track shoes. I really can see no way that these tracks can be used by any kit. Perhaps they would be good for welding onto the kit hulls as add-on armor?

Curiously, the tracks from OKB Grigorov vary in width between track sets. So modifications to each of the above sprocket wheels, including OKB's own sprockets, will have to vary, based on which OKB tracks are being used. The first table below shows the hub modifications (if any) needed to make these tracks fit the OKB sprocket wheels.

Track Name Track Width Necessary modifications to OKB hubs:
WE210 I cannot find my set of tracks (!). Probably need to be shortened by 1.5 mm, but cannot confirm until I find my tracks.
T54E1 6.3mm Tracks are just a little bit loose, but no adjustment is necessary.
T54E2 6.0mm Hub should be shortened by 1.0 mm.
T62 6.4mm No adjustment necessary.
T48 6.4mm No adjustment necessary.
T49 6.1mm Hub should be shortened by 1.0 mm.
T51 6.5mm Perfect fit.
T56 6.5mm Perfect fit.
T74 6.3mm Tracks are just a little bit loose, but no adjustment is necessary.

This table shows the hub modifications (if any) needed to make these tracks fit to sprocket wheels of other manufacturers. The question marks on the ESCI and Revell wheels indicate the possibility that this particular track/sprocket wheel combination may not work, due to the end connectors not fitting between the sprocket teeth, due to the track shoe pitch being different than the gap between the teeth.

Sprocket OKB Track
WE210 T48 T49 T51 T54E1 T54E2 T56 T62 T74
Dragon ? +0.5 0 +0.5 +0.2 0 +0.5 +0.5 +0.2
Eduard/ExtraTech ? +1.5 +1.0 +1.5 +1.5 +1.0 +1.5 +1.5 +1.5
Heller ? +1.0 +0.5 +1.0 +0.5 +0.5 +1.0 +1.0 +0.5
Italeri/ESCI ? +1.5? +1.0? +1.5? +1.5? +1.0? +1.5? +1.5? +1.5?
Mirage ? +1.0 +0.5 +1.0 +0.5 +0.5 +1.0 +1.0 +0.5
MR Models ? +1.0 +0.5 +1.0 +0.5 +0.5 +1.0 +1.0 +0.5
Revell ? +1.0? +0.5? +1.0? +0.5? +0.5? +1.0? +1.0? +0.5?
Trumpeter ? +1.5 +1.0 +1.5 +1.5 +1.0 +1.5 +1.5 +1.5
UniModel ? +1.0 +0.5 +1.0 +0.5 +0.5 +1.0 +1.0 +0.5
 

Back to Special Topics

Return to Table of Contents

Modeling the Sherman Tank in 1/72nd Scale