| M4A2 Emcha | MR Modellbau Kit #7231 |
| Article by Stephen Brezinski; last updated October 2012 | |
 |
|
| Modeling the Sherman Tank in 1/72nd Scale |
| M4A2 Emcha | MR Modellbau Kit #7231 |
| Article by Stephen Brezinski; last updated October 2012 | |
|
|
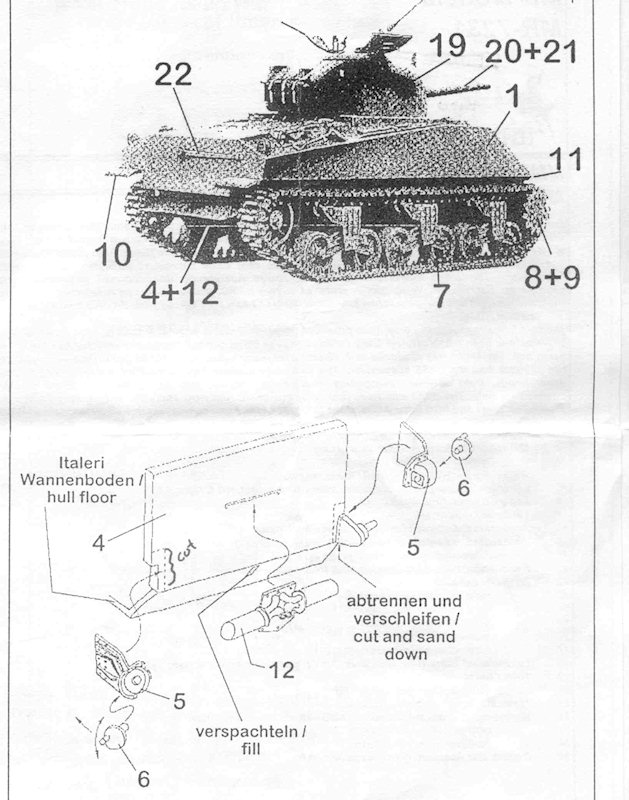
INTRODUCTIONThis kit is a conversion kit designed to be used with the lower hull and suspension of the ESCI - Italeri M4A1 kit. I think could be used with the Trumpeter, Dragon and UM M4 kits as well; in fact I think a Trumpeter M4 lower hull may be the better option. This 1/72 scale kit represents a mid-WW2 diesel engine Sherman. Based on the square, welded driver’s hoods protruding from the 57 degree angled glacis plate this is a Sherman produced by Fisher Company. Fisher was the only Sherman manufacturer to produce and use this type of hood and it is commonly referred to as the “fabricated” hood. Other producers used cast driver’s hoods until introduction of the 47-degree glacis. I have never seen applique armor fitted to the fabricated hoods as was common to the cast hoods. This M4A2 variant was used by US Marines on Tarawa, by the Poles in Italy, by UK forces, and by the Soviets. For an in-the-box review and photo of all the kit parts I refer you to: http://www.onthewaymodels.com/reviews/MrModels/M4A2USMCprev.htm Many of the assessments of this particular conversion kit should also reflect other 1/72-scale Sherman kits offered by MR ModellbauAssembly Instructions
The instruction sheet has one small photo of an M4A2 Sherman with part numbers and line going to where the parts go; unfortunately the resin parts in the kit are not numbered on the pore plugs or parts. This photo shows the T49 type tracks. Missing from the kit but visible in this photo is the sheetmetal exhaust deflector on the rear just under the muffler (part 12). This deflector can be made with some sheet aluminum, such as that from an old pie pan. The lower line drawing shows modification of the resin lower rear armor plate and attachment of the muffler (part 12) and the idler wheel axles and brackets (parts 5 & 6). Be aware that parts 5 have a left and right so don’t mistakenly mount them reversed and upside down. I recommend not installing the muffler till after the upper hull is attached to the lower hull. If we substitute a Trumpeter or Dragon lower hull then we do not have to be concerned with this step, except for the muffler.
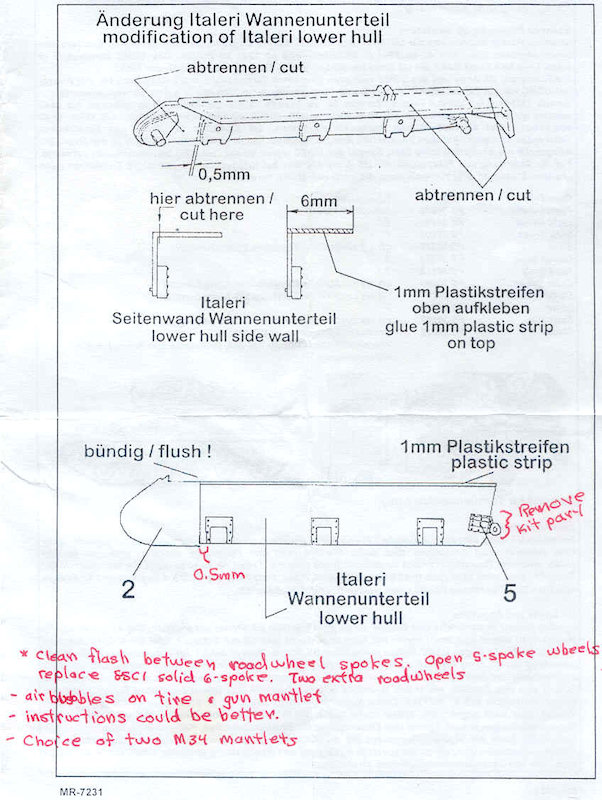
This is another page of MR’s instructions (with my own notes) on converting the ESCI lower hull to fit with the MR upper hull part. Measure carefully and use a small T-square to insure cuts are at a right angle. This is an easy step to make mistakes on. Again, if we use a Trumpeter kit’s lower hull we need not worry about this. The Parts
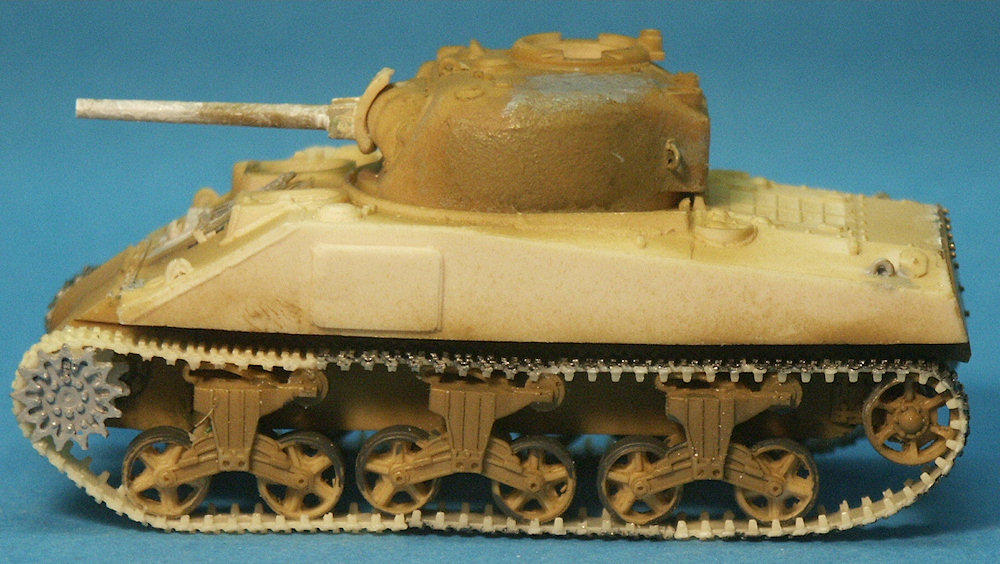
Here is a photo of some of the larger parts in the MR kit. The MR kit is a mix of cast resin and cast white metal parts with a turned aluminum gun barrel. On the hull the cast intermediate-type, one-piece differential (a.k.a. final drive or transmission) cover has been affixed to the hull. There are applique armor plates on the starboard side indicating it is not an initial production M4A2. Detail of the MR Models small-hatch M4A2 hull and turret appear excellent: with accurate molded on lifting rings, fabricated antenna bracket on the glacis and cast rear turret splash guard introduced in 1943. I think the rooftop exhaust vents are better done on the Dragon Sherman though. The weld seams look excellent. The turret appears to be a low bustle style designated D50878 (based on my reference) produced in the summer and autumn of 1943. It is without the loader’s hatch, and features welded-on applique armor on the right cheek, the narrow M34 mantlet and gun mount, and the hole for the smoke mortar requested for UK Shermans and later adopted in US Shermans. MR provides open 5-spoke roadwheels and idlers for use with the ESCI bogies; the roadwheel tires appear too thin to me and are one of the few problems I found with the kit. 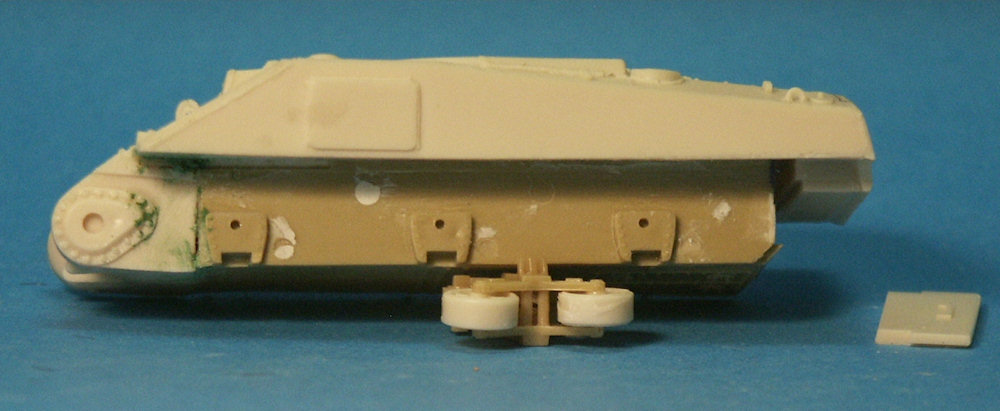
Here is a view of the port side with the plastic ESCI – Italeri lower hull assembly attached. The differential cover is a tad askew and I believe I should have done better. It is very important that when cutting off the front of the ESCI hull side you have to get the cut in the exact position and straight so it fits true and in the right position with MR’s cast resin differential; this is where I had problems. Along with fabricating a new sponson floor, mistakes can lead to bogies in the wrong location, that are too low or high, or canted in or out. Something I did not notice at this point in assembly is that this MR resin hull is warped; the bottom of the sponson is curved up on both ends! Oye! 
This a comparison photo with the DML kit of a Fisher produced M4A2(75) kit. The biggest anomaly we see is the curve of the MR rear plate as it progresses up and under the sponson. I have no idea where MR got this from, it is not in their M4A2(76) kit and I have never seen it on an actual M4 tank; it should be a right angle as with the DML kit at left. The sponson side of the MR kit also looks too tall compared to the DML hull and to scale drawings. Green putty has been used on the MR rear plate to smooth it out after cutting off the large pour plug. The MR rear plate has had holes marked out and drilled for a series of six horizontal bolts and four vertical bolts missing from the MR hull. 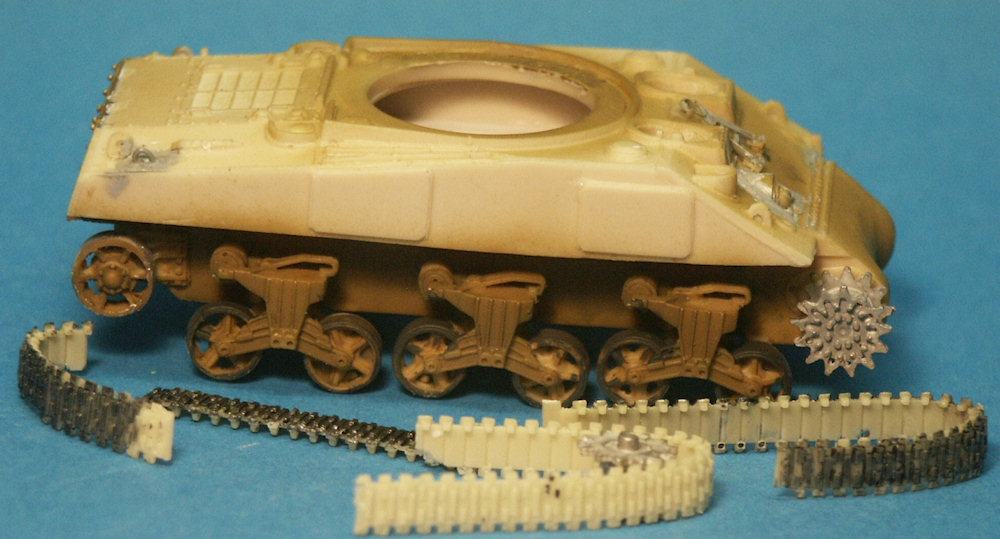
This photo shows the bogies and other wheels attached, pre-painted in acrylic olive drab paint and ready for the tracks. The MR early type fancy sprocket wheel (Parts 8 & 9), cast in white metal, supplied with the MR resin tracks is used. The later simple sprocket would be just as valid. Rather than use the stiff polyethylene band tracks that came with my old ESCI kit I opted for the resin MR aftermarket tracks (set MR-7261) which represent all-steel T-49 type M4 track, a type common to UK and Soviet Shermans. After cutting the resin track lengths from their pore blocks and clean-up with a small file they were dipped in very hot water and bent to fit around the sprocket and idler wheels. It was a real race to bend the tracks into the correct shape before they quickly cooled and hardened. 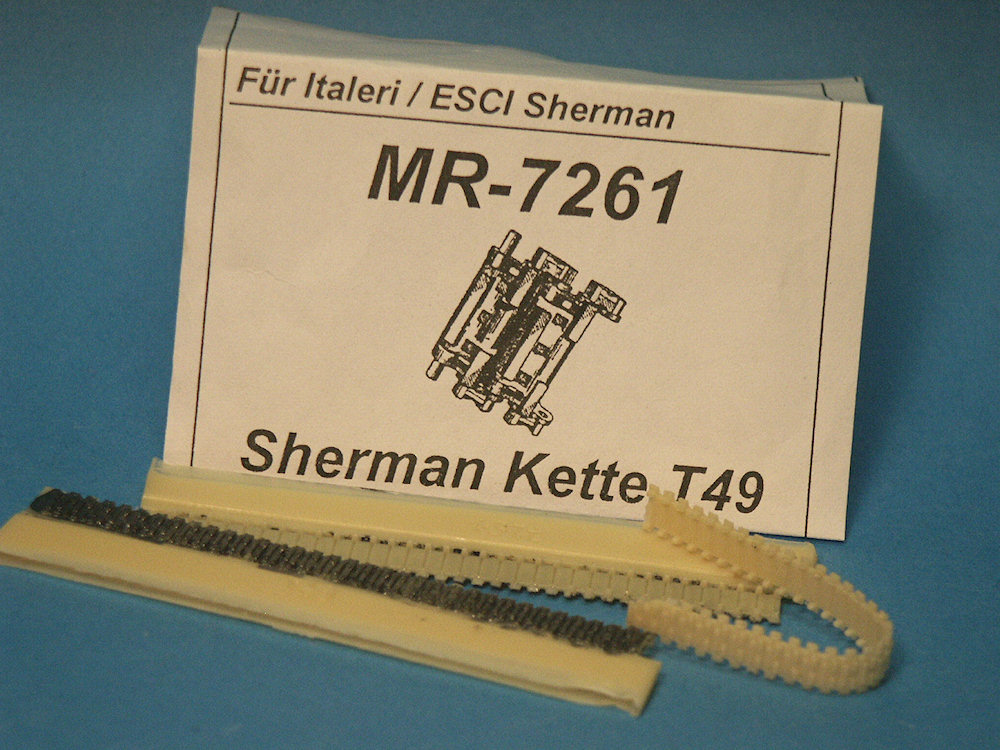
The MR resin tracks are molded well and reasonably easy to cut off the pore blocks. The guide teeth are a little small in size and many were broken off. When bending the tracks and gluing them to the wheels be sure to orient the broken teeth and end-connectors on the inside edge where they can’t be seen. 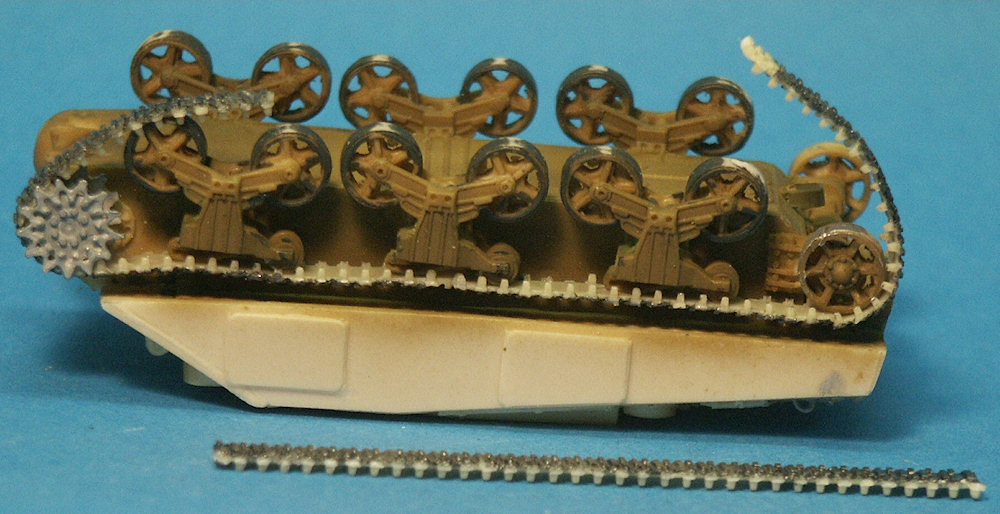
My approach was to glue on the curved sections around the idler and sprocket wheels and then splice in the horizontal sections of track in the gaps. Much of the track is prepainted in acrylic gunmetal color. The roadwheels are pre-painted dark gray and then the areas to get glue are sanded free of paint. The fit of the MR resin track into the sprocket teeth was very good.
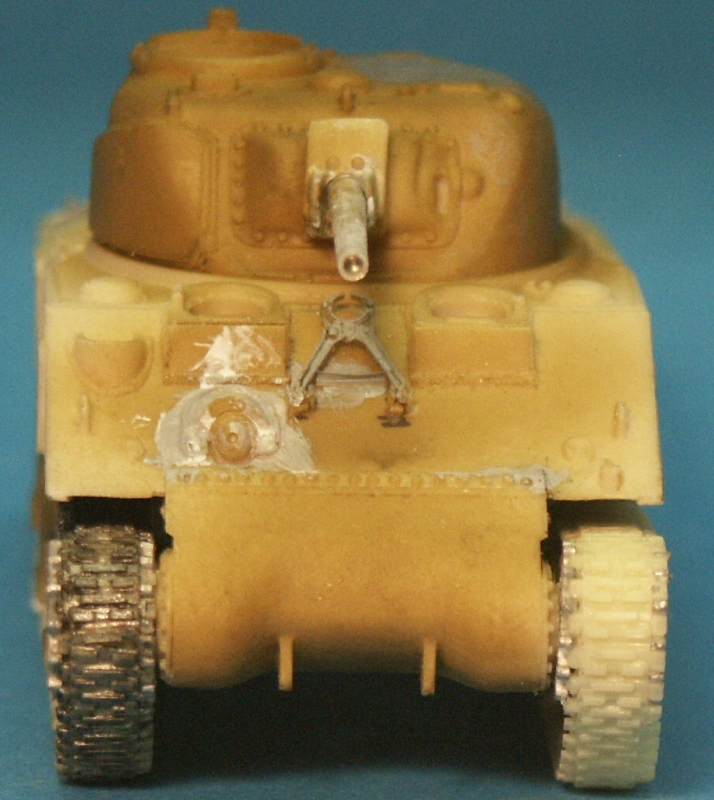
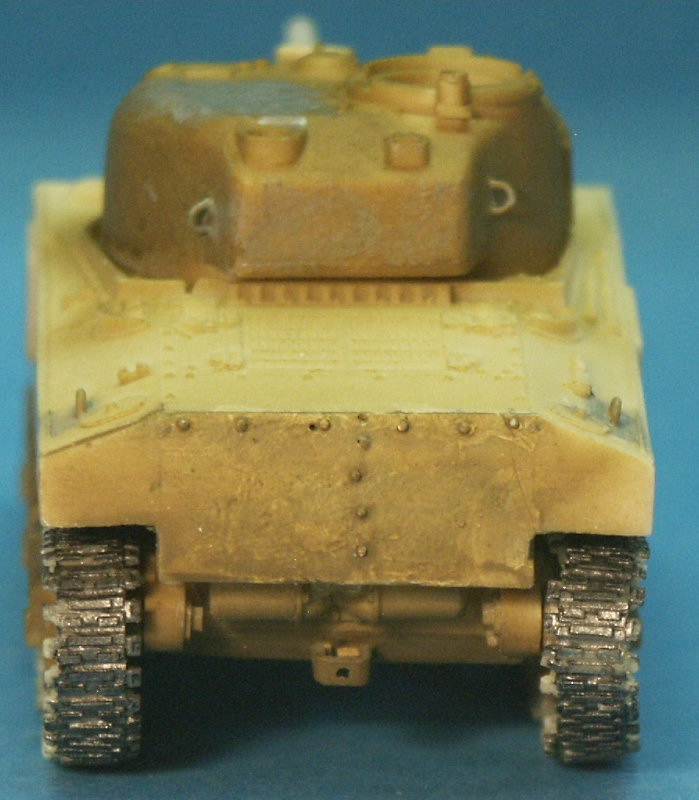
A front view at left shows a slight inward cant to the tracks on the right, the port side; my fault in assembling the lower hull: learn from my mistakes! Don’t look too closely there are some other mistakes to correct! This M4A2 is to represent an early production Soviet Emcha that had the gun travel lock or cradle between the hoods. After rough handling needed to get the tracks on the small delicate parts and the etched brass parts will now be added. In the view of the rear at right we can see that the curved angle where the sponson bottom meets the lower hull side has been squared off a bit but now we see that the sponson floor is not molded truly horizontal, it slopes down; the sponson floor does not meet the hull side at a right angle. This appears to be a casting problem and not present on another MR Sherman kit I have. I hope the rear fenders (part 10) will mask this problem?
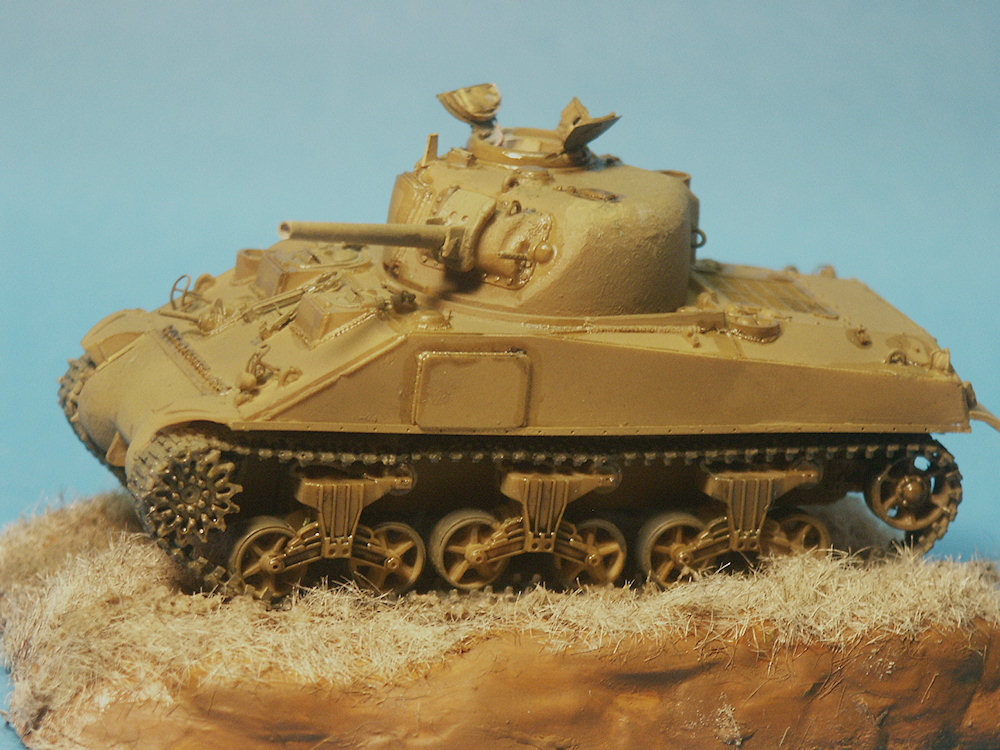
This port-side view shows the tracks affixed to the suspension. It looks like the sprocket is mounted a little higher than the top of the bogies, not good. There is too much sag in the lower rear in front of the idler wheel, this is due to the difficulty in bending the track in the correct position before the resin track cooled and stiffened. Remember, the M4 Medium tank, as well as the M3 Medium and M3 Light tanks) all used “live” track which enjoyed little noticeable track sag. Some missing track teeth will need to be replaced just behind the sprocket wheel. At this stage in assembly, when it was too late to sand flat, I noticed that the sponson bottom is curved up at both ends, bulged out on the bottom, we can see it in the photo, this is not photo distortion. The engine deck and hull top is not visibly distorted so I am surmising this defect is because of improper resin curing? Alas, at this stage there is not much I can do to fix it! The tires on the MR Modellbau roadwheels appear too thin to me, not as well rendered as the same roadwheel type in the Mirage M3 and Dragon M4 kits. 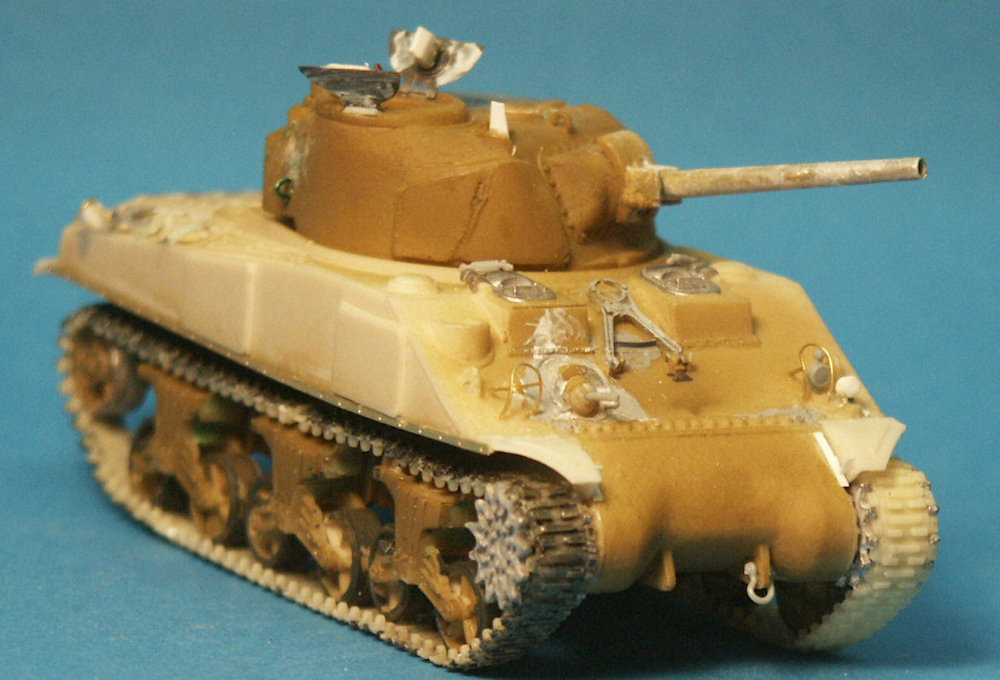
The white-metal driver’s hatches have been installed shut since their undersides are not detailed. Small fender braces have been added and etched brass headlight brush guards. In this photo the curved sponson bottom is very evident; the etched-brass strip only accentuates the curve. This curve, distortion was not present in the hull of my MR M4A2(76) resin kit. The commander’s hatch is made up of etched brass parts from a brass fret for the Revell M4A1(76) kit. The hatch is actually a little too thin. 
Here’s a good view of the bolt detail added to the rear hull plate. The bad angle where the sponson floor does not meet the hull side at a right angle has been masked by the rear fenders. 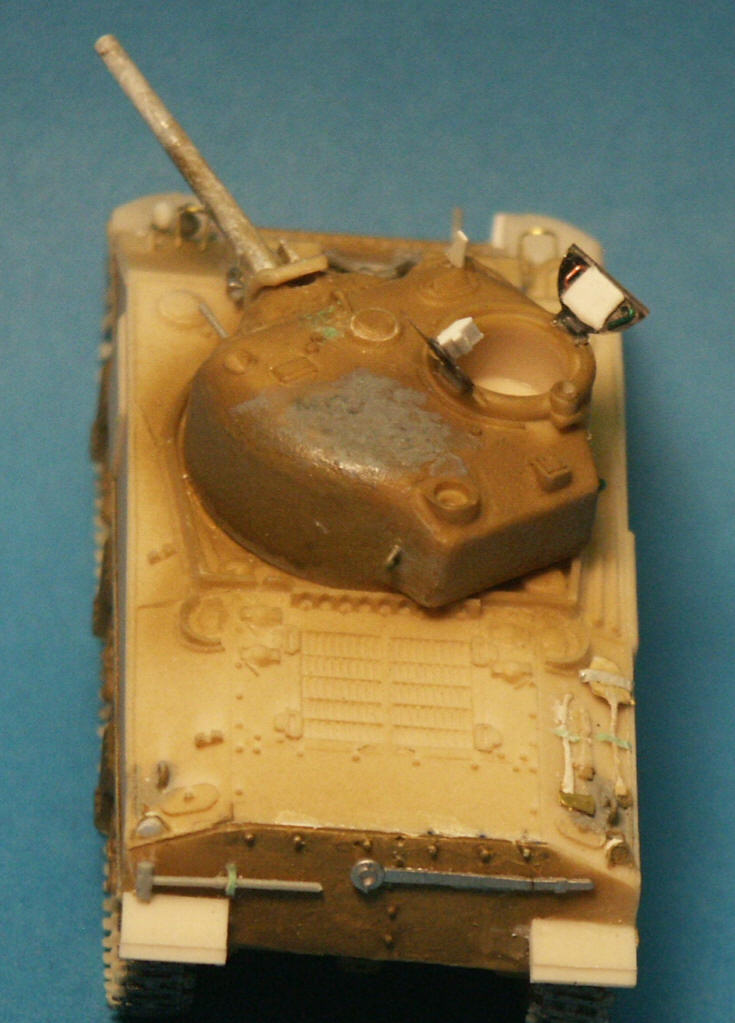
An overhead view of the tank rear prior to painting and weathering. On the right side are some etched brass tools such as shovel and axe. Normally I would not use them because they are much to flat and thin but with the major defect of the hull distortion I won’t be entering it into any contests. I have read that often the crews, to prevent them from being stolen by passing infantry, often removed these tools. 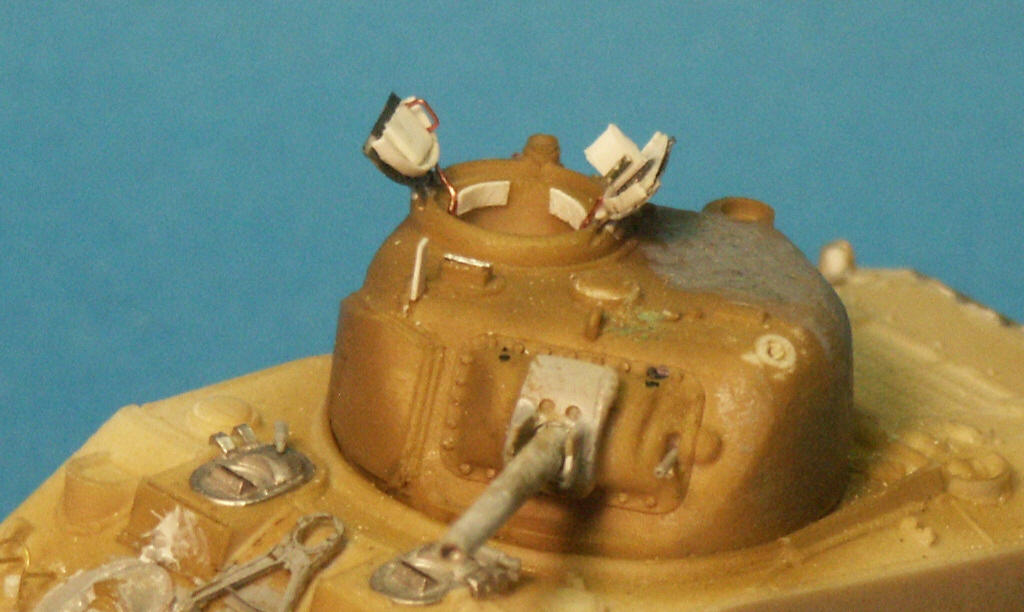
Close-up view of the MR turret. For changes: a sighting vein was added in front of the commander’s cupola, a coaxial machine gun barrel, and lifting rings on the gun mount. The smoke bomb ejector hole right of the gun was not present on this early turret so will be filled in. The MR cupola has no interior detail, and the etched brass split-hatch I used is pretty Spartan also so lots of small detail parts like the hatch lip, periscope, handles, and cushioning pads were scratchbuilt. 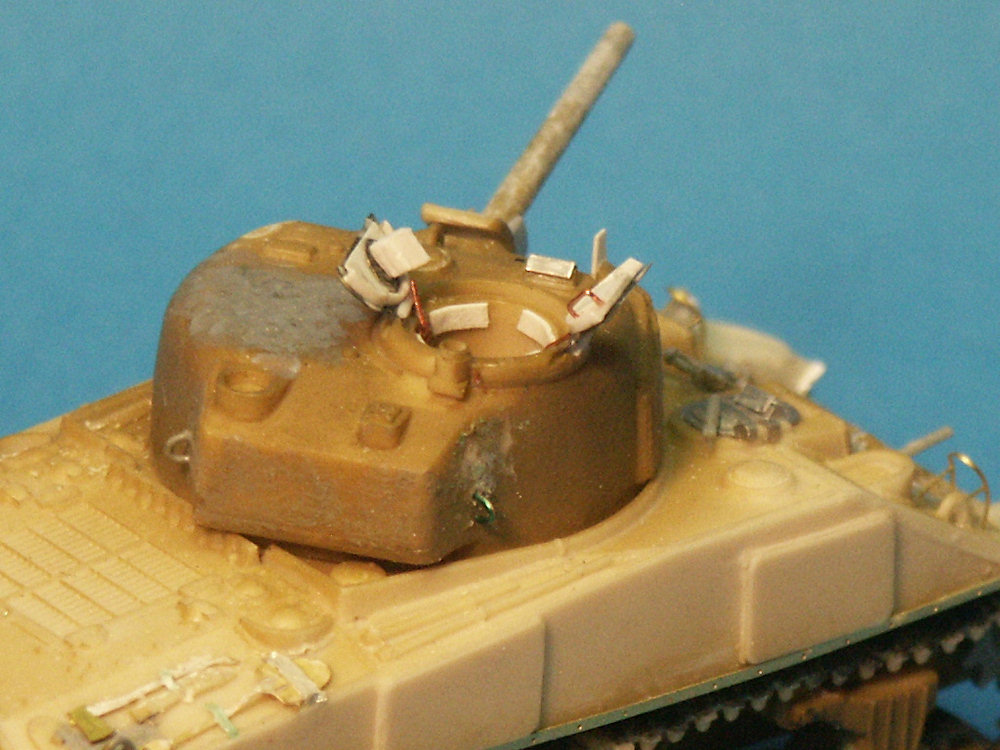
From the rear we see a different views of the turret and hatch details. Note the strips of leather cusions around the inside rim of the cupola. It is when we are detailing things like the open hatch when great resources like the book M4A2 Sherman, Part 1, Armor Photogallery #11 really help. A minor detail is the low mounting of the rear lifting rings on the turret.
Skipping a step or two the M4A2 has been given an initial base coat of olive drab acrylic paint, given a point wash of artists oil in turpentine, and then mounted on a base representing a grassy knoll. (Yes, the tall grass can hide some of the poor track detail and missing guide teeth).
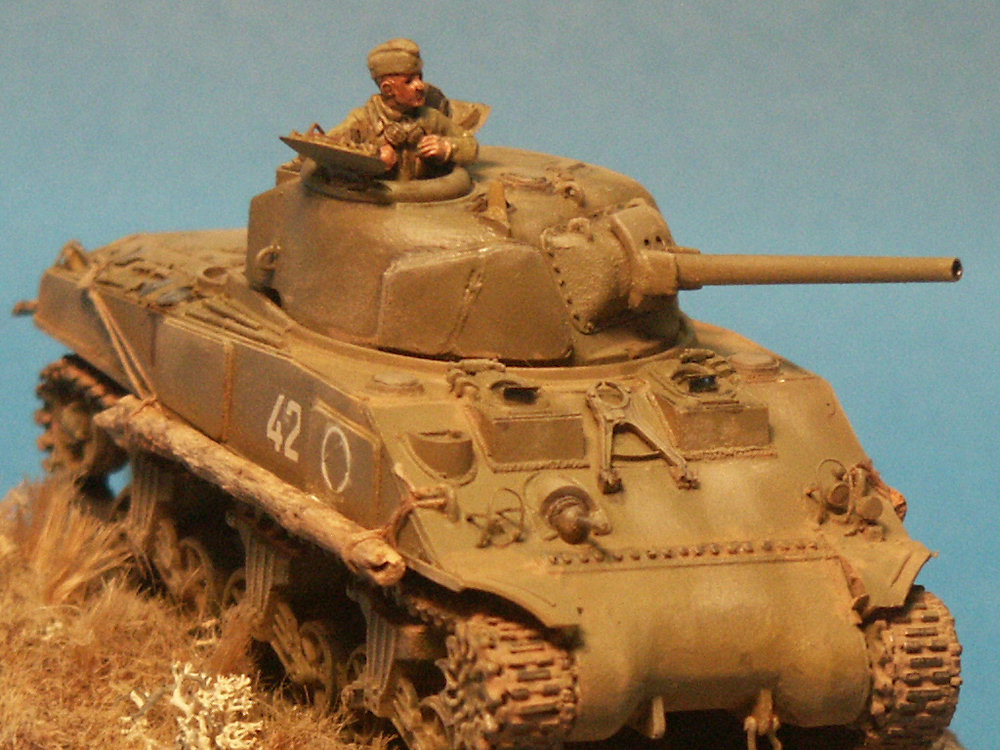
A coat of olive drab, lighter than the initial coat has been spayed, blending in the dark wash around the recesses. The underside of the open commander’s hatch is the same color as the tank exterior and the pad on the underside of the hatch painted in brown leather. An acrylic gloss coat has been applied around the turret side in preparation for some Soviet decal markings. A brown stain representing a diesel spill flows down the side from the drainhole up on engine deck.
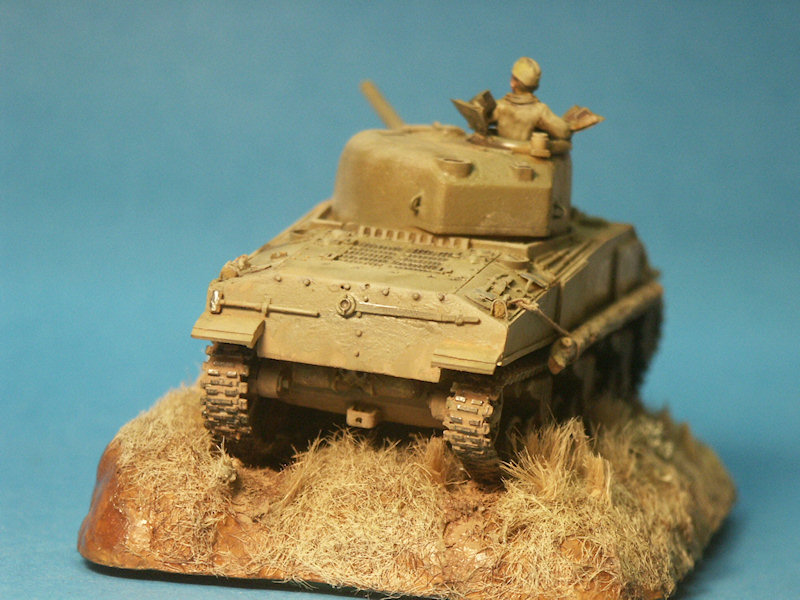
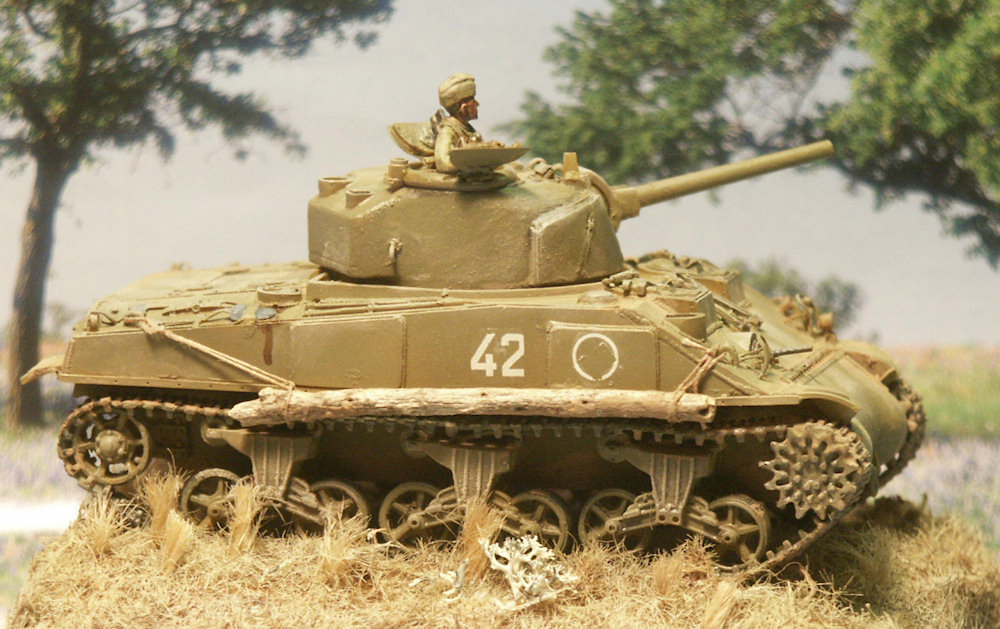
The completed model. After a spray of clear flat coat the M4A2 was highlighted with Tamiya Weathering Master, and dusted with paint pigment powder. The dull coat is mixed with a flat tan paint to help mute, tone down, the colors and markings on the model. A graphite pencil was gently rubbed over the machine gun barrels, track cleats, the 75-mm gun muzzle and on expected wear spots on the paint like hatch edges. Logs for un-ditching the tank have been hung from each side to try and mask the curved distortion of the hull side, or at least distract from it. Honestly I have seen many Soviet tanks with logs lashed to the vehicle but never with an un-ditching logs hung this way. Another thing I do not like is that the MR resin tracks look too thin, in addition to being hard to work with. I like the looks of the weld beads in addition to the overall other excellent detail on the MR Sherman tanks. The weld beads are perhaps over exaggerated a little but that is fine with me. The background is simply a photograph I propped up behind the photo.
In this photo I’ve played with the color and tone of the photo giving the Sherman a more olive drab color. The red-brown pigment powder and lighter hightlighting is well evident here. The dark periscope lenses are replicated with pieces of dark camera film attached with white glue. The figure is a white metal Soviet tanker from AB Models cut in half to fit in the hatch. While some AB figures are very well rendered this one did not have well done facial features. I only use them in hatches as the AB figures I have tend to be short in the legs and look dwarfish to me. Markings were scraped together from extra decals and represent an Emcha from the Soviet 2nd Tank Army unit near Smolensk, inspired from a photo in and information in the book Comrade Emcha, Red Army Shermans of WW2. Though this small-hatch early Sherman variant has the applique armor plates on the hull sides and turret it does not have the additional armor plate in front of the driver’s hoods like many other small-hatch Shermans. In the many photos I’ve studies I have never seen a Sherman with the fabricated (welded) hoods have the extra armor plates. I could be wrong but only the cast steel hoods seem to only have the extra armor plates. The welded, fabricated hoods were only used by Fisher Company.
Rear of the completed model. This M4A2 does not have the sheet metal exhaust deflector like other (later production?) M4A2’s did. This is a good view of the steel bar tread pattern of MR’s T-49 type Sherman track. I have seen this track on many Soviet Shermans. Conclusions1) The Fisher Company produced M4A2’s used by the US Marines on the island of Tarawa in November 1943 did not have the applique armor but did have the later wide M34A1 gun mount. To make a Marine M4A2 we’ll have to sand off the applique armor plates and replace the M34 gun mount then take an M34A1 gun mount from another kit. 2) The conversion kit is a good kit with some of the best detail that I would recommend for the intermediate and advanced modeler. There are some molding defects in the hull that I have not seen in other MR Sherman kits I have. 3) The MR resin tracks are challenging to work with but other than T49 tracks included in a few Dragon kits, these are the only T49 Sherman tracks available that I know of. 4) With the release of a plethora of new1/72-scale Sherman kits by the likes of DML, UM, Trumpeter, HAT and Italeri, etc., I am curious as to the future of more expensive resin Sherman kits such as this? 5) Though this resin conversion kit is supposed to be mated with the 1/72-scale Italeri/ESCI plastic Sherman kit, it should work with other plastic kits. My favorite to mate with an MR resin Sherman is a Trumpeter Sherman lower hull and suspension. The small fittings like headlights and tools are pretty crude in the ESCI Sherman so for a good display model it is best to acquire some from a DML Sherman kit. ReferencesTank Battles of the Pacific War, by Steven Zaloga, Concord Publications Co., (1995). ISBN 962-361-607-4. This softcover book covers combat and vehicles used by US and Japanese forces. Comrade Emcha, Red Army Shermans of WW2, by Claude Gillono with Leife Hulbert, The Oliver Publishing Group (2011). ISBN 978-0-9806593-7-5 M4A2 Sherman, Part 1, by Wojciech J. Gawrych, Armor Photogallery #11. Sherman Minutia website This is the best on-line reference for the details of the Sherman tank variants; not as much of vehicle combat history though. http://the.shadock.free.fr/sherman_minutia/index.html Modeling the Sherman in 1/72 Scale website. Doug Chaltry’s excellent website on the Sherman tank. |
| Modeling the Sherman Tank in 1/72nd Scale |