| (This article has
been updated to include information from Danilo Carli.
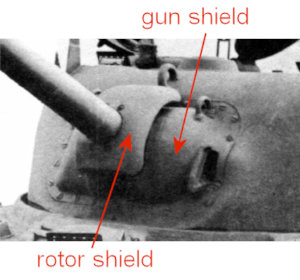
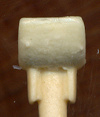
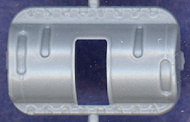
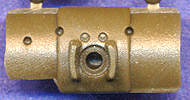
Thanks Danilo!) The M3 75mm cannon was the standard main armament of the M4 Sherman at the start of the war. Although the Sherman was upgraded with the M1 76mm cannon (in the T23 turret) in the final years of the war, 75mm-armed Shermans served on all fronts through to the end. The gun mount came in two basic versions, the early M34 with a narrow rotor shield (with or without armored side plates to protect the base of the gun barrel), and the later M34A1, which had a much wider rotor shield that provided better armor protection to the entire front of the turret. The two terms in the photo below I believe are the official Army terms. I have frequently seen these terms confused in the modeling community, and even within some technical reference books as well. The 'gun shield' is often referred to as the 'gun mantlet' or the 'rotor', and the rotor shield is sometimes referred to as the 'gun shield' or 'mantlet shield'. In this article, I use the terms shown below. Sorry that I am not consistent throughout the remainder of the site.
This article is intended to show side-by-side comparisons of all the 75mm gun and rotor shields available to us modelers in both plastic and resin. Below the shield comparison scans, I provide additional scans of the 75mm gun barrels for comparison as well.
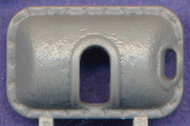
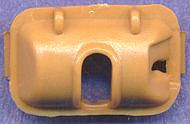
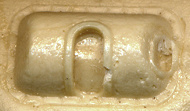
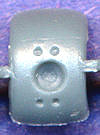
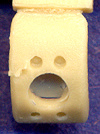
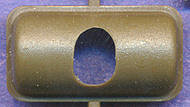
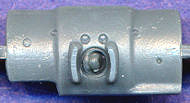
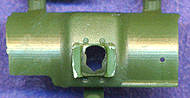
M34 Gun Shield The M34 gun shield had a perforated rim (flange) around the outer edge which was screwed to the front of the turret face. All of the kits below, with the exception of ExtraTech, chose to mold that rim integral with the shield, as it should be. ExtraTech has that rim molded onto the face of their turret, thereby complicating matters if one wishes to swap parts between kits or aftermarket accessories. The dimensions for the gun shield are difficult to determine, due to imprecise drawings in my references. The most common measurements show that the shield, with the rim, should be 13.5mm side-to-side, and between 7.7-8.3mm tall in 1/72nd scale (I'm leaning towards the larger number). I have seen an on-line discussion by one of the authors of the Son of Sherman book state that the dimensions should be 13.4mm x 8.1mm, so these are the measurements that I will use as a reference for the following comparison. Although you see minor variations in the measurements below, they are all within an acceptable error in my eyes. More important than the precise scale is the amount and quality of detail, such as the screws and lift rings. Lift rings: all M34 gun shields had a pair of lift rings attached to the top as seen on a couple of the examples below. Very early examples had them closer to the centerline, where they could interfere with the rotor shield (I think this style was very rare). Hence they were moved outward. Should the rim be flush with the front face of the turret? Not entirely. It sits just a little bit above the turret face. In this scale, I don't think it would look bad if it was flush, but it really should stand out a little bit.
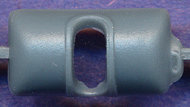
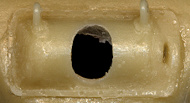
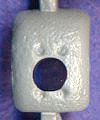
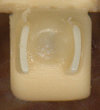
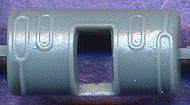
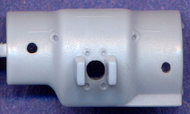
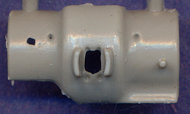
M34 Rotor Shield Due to the curve on these parts, I was able to measure only the lateral dimension, which should be 5.0mm wide. For those pieces that have the side armor to protect the gun barrel, longer and thinner is more accurate, such as seen on the Dragon or resin examples.
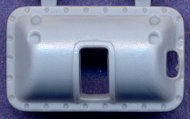
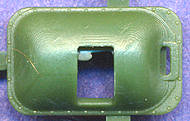
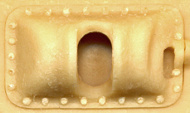
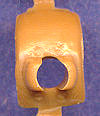
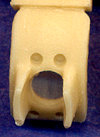
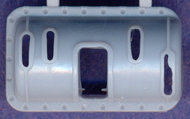
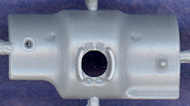
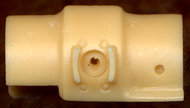
M34A1 Gun Shield Although my reference drawings are inconsistent and show this gun shield to be a little smaller than the M34 gun shield above, that is incorrect. The opening in the turret face was the same for all M4 turrets, and these gun mounts (including the 105mm and 17pdr gun mounts) were interchangeable. Therefore the dimensions should be 13.4mm x 8.1mm. The four, oblong openings in the gun shield are for the gun sight, coaxial .30cal machinegun, and two connectors to the rotor shield. Some kits represent these much better than others, but with the rotor shields mounted, they will not be visible. I guess these would be important only for those building a diorama with the rotor shield removed for maintenance. There were two versions of this shield:
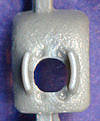
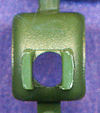
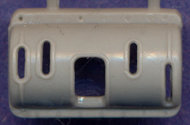
M34A1 Rotor Shield Due to the curved shape of the rotor shield, it's difficult to measure anything other than the lateral dimension. Although my references give a range of dimensions, the measurement should be 14.2mm (with the left side being slightly longer than the right - 7.2mm vs. 7.0mm). This means that most of the pieces below are just a bit too wide, though not noticably so. There were actually two different rotor shields - one for each type of the gun shield. The right side of the shield was lengthened a small bit for the late version of the gun shield, since that one was widened to cover the rim. The way to identify them is by looking at the distance between the gunsight aperture and the edge of the shield. You can see the upper two scans in the table below show this difference, with the Dragon kit having the earlier style, and the ESCI kit the later. I don't know what the difference in width would be for the model parts, but it's likely less than a millimeter.
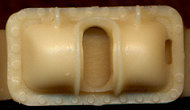
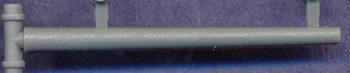
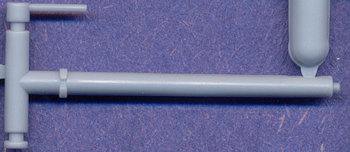
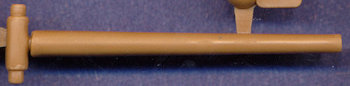
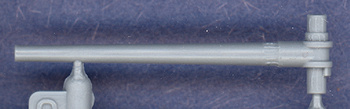
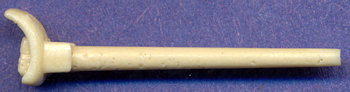
I measured the lengths of the gun barrels from the base where it emerges from the rotor shield to the tip. Once again, my references differ. (You can tell when a reference isn't very reliable when several similar drawings within the same book have different numbers for the same measurement!) After converting to 1/72nd scale, the measurements I came up with varied from a low of 23.3mm (Son of Sherman) to a high of 24.3mm (Codename Swallow). I used a middle number of 23.7mm (shown in both Hunnicutt and Militaria i Fakty) as a standard for comparison of the following parts. I think that any part that falls within this 1mm range (23.3-24.3) is acceptable. For the plastic parts shown below, I assembled the pieces per instructions before measuring.
As with all of these comparison articles of very small parts, the great magnification of the scans emphasizes the minor differences between parts. As I've mentioned before, I feel that the overall look of the pieces, which is affected by proportional dimensions and quality of detail, is far more important to me than the precise measurements. Considering the variation in my reference drawings (not having exact measurements), and again, the small size we're dealing with here, the vast majority of the parts shown above fall well within an acceptable range of error for 1/72nd scale. The primary reason I prepared this comparison review was to help modelers judge the compatibility between kits when swapping parts or using aftermarket pieces. |